


Natural Language Prompting Guide for Lucid & Studio Engines
On this page
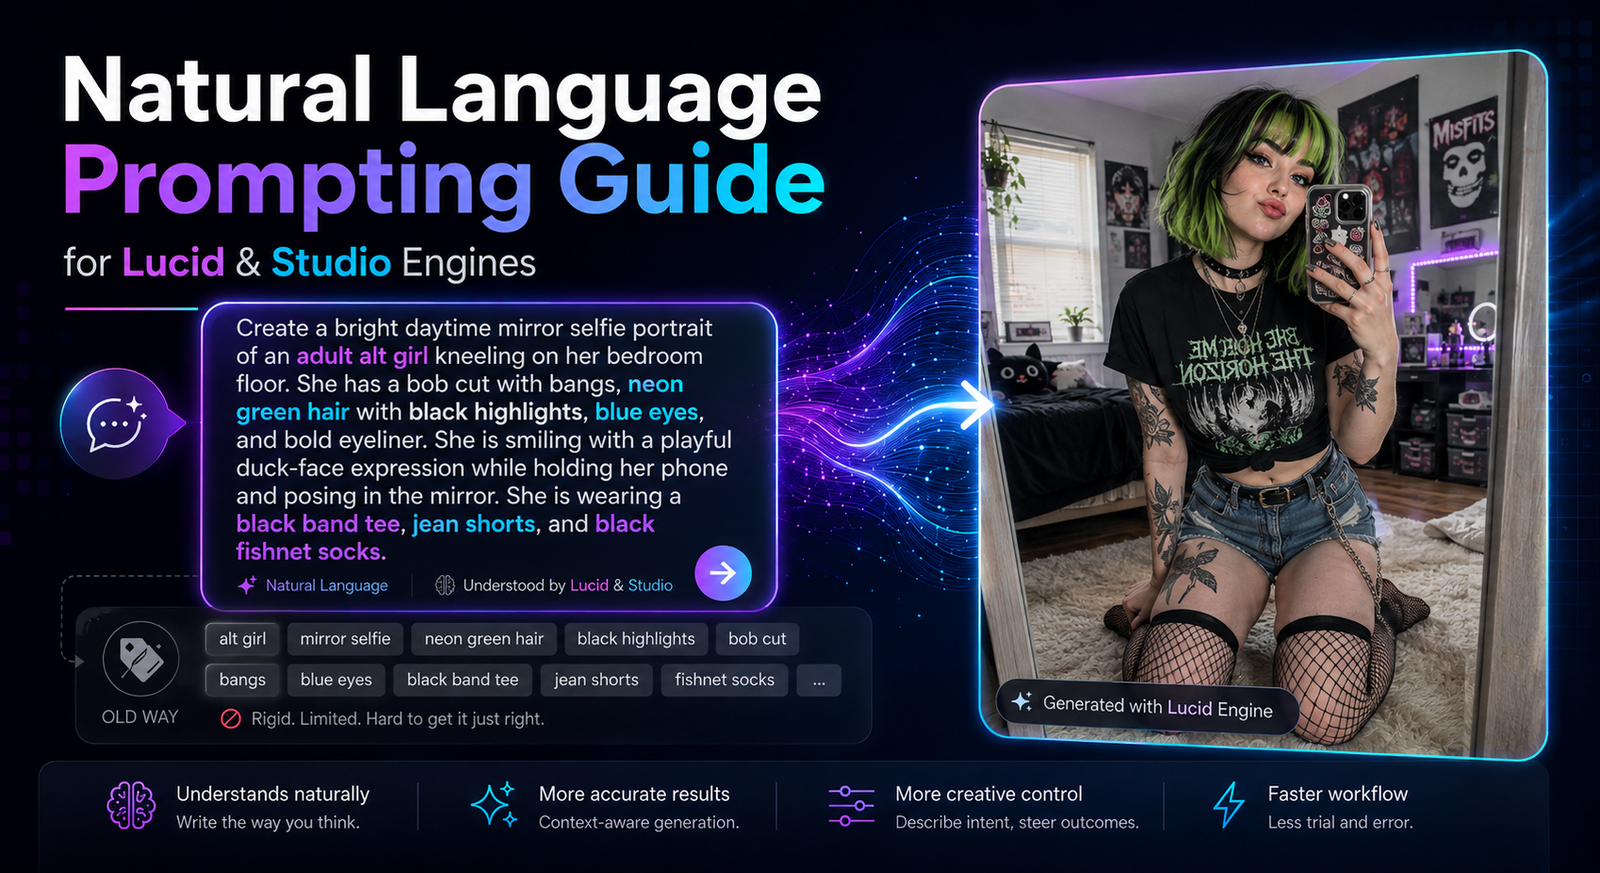
Natural Language prompting lets you describe the image you want using normal sentences and instructions instead of relying on lists of disconnected prompt tags.
Our Lucid and Studio Engines are designed to understand Natural Language prompts. This means you can describe characters, clothing, actions, environments, camera angles, lighting, materials, and other details much like you would explain an idea to a photographer or artist (i.e. in full sentences).
This guide explains how Natural Language prompting works, how it differs from the Tag-Based Prompting used by Lab Engines, and how to write better prompts for both Text-to-Image, Magic Edit, and Reference-image generations.
What Is Natural Language Prompting?
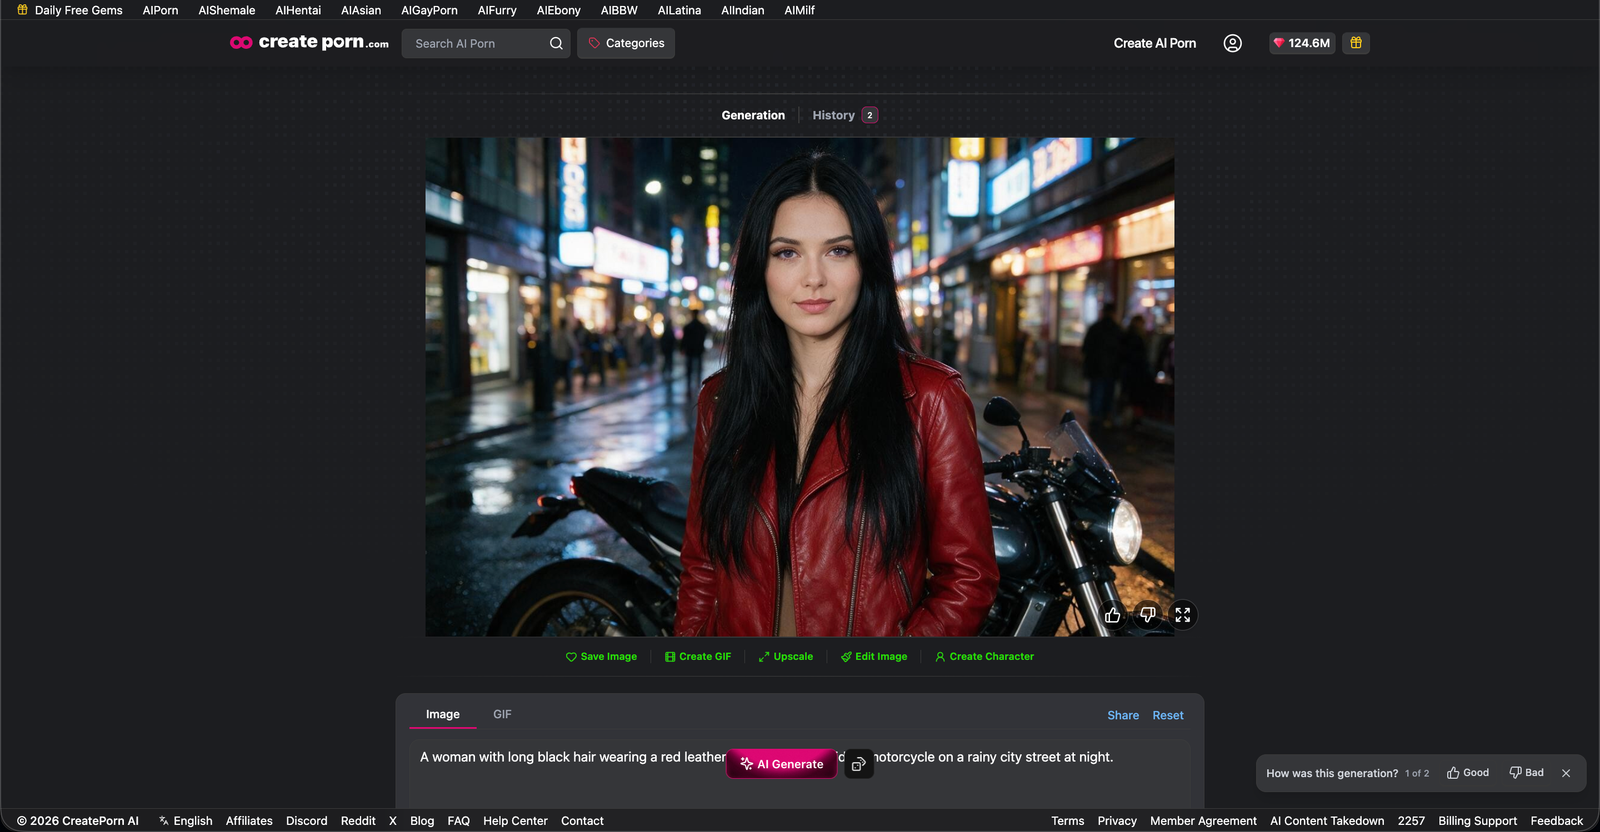
Natural Language prompting means describing your intended result using normal written language.
Instead of entering a list of individual keywords, you describe how different parts of the image should work together.
Example:
A woman with long black hair wearing a red leather jacket stands beside a motorcycle on a rainy city street at night.
The prompt establishes:
- Character: A woman with long black hair
- Costume: Red leather jacket
- Prop: Motorcycle
- Environment: City street
- Weather: Rain
- Time: Night
- Relationship: The woman is standing beside the motorcycle
Natural Language models can use these relationships to better understand the overall scene you are trying to create.
Why Newer AI Models Use Natural Language
Earlier image-generation models often relied heavily on individual keywords and dataset-style tags.
As AI image models have improved, they have become better at understanding complete instructions, relationships, context, and creative intent.
Modern Natural Language Engines can increasingly understand instructions such as:
- Place one character behind another.
- Keep the character's face unchanged.
- Replace the chair with a sofa.
- Make the lighting come from the left.
- Give the character a sword in her right hand.
- Put the city in the distant background.
- Keep the same pose but change the clothing.
- Make the scene look like a cinematic photograph.
- …and much more.
Because of this, prompting is gradually becoming less about finding special keywords and more about clearly communicating what you want the finished image to look like.
Lucid and Studio follow this newer approach.
Which Engines Use Natural Language?
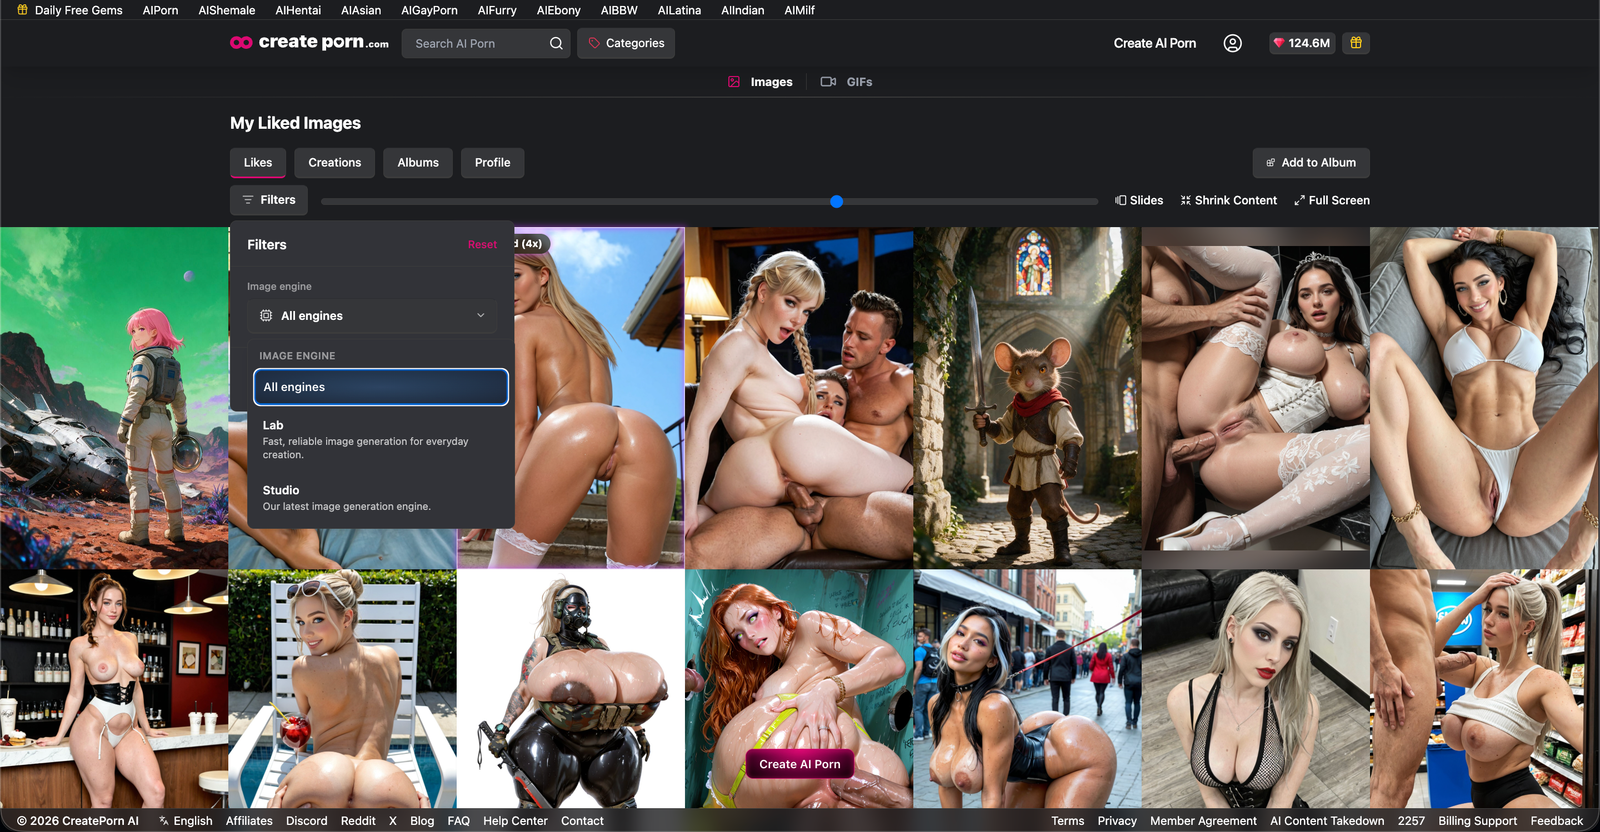
The recommended prompting method depends on the Engine you are using.
| Engine | Prompting Method | Recommended Prompt Style |
|---|---|---|
| Lucid | Natural Language | Sentences and instructions |
| Studio | Natural Language | Sentences and instructions |
| Lab Engines | Tag-Based Prompting | Short, comma-separated descriptive tags |
Note: A prompt written for a Lab Engine should not automatically be copied into Lucid or Studio. Rewriting the prompt as a clear Natural Language description will usually give the model more useful information.
What Is Tag-Based Prompting?
Tag-Based Prompting describes an image using short keywords or phrases separated by commas.
You may also see this referred to elsewhere as Danbooru-style prompting. In this guide, we use the more general term Tag-Based Prompting.
Example:
woman, long black hair, red leather jacket, motorcycle, city street, night, rain
Each tag represents one detail you want the model to include.
Tag-Based Prompting is primarily used by Lab Engines.
Our existing Tag system follows a similar principle: Tags provide preset details that can quickly add specific concepts to a generation.
Natural Language vs Tag-Based Prompting
Both methods can describe the same image, but they communicate information differently.
Describing a Character
| Prompt Type | Prompt | What It Shows |
|---|---|---|
| Lab Engine | woman, black hair, ponytail, green eyes, red dress | Uses separate tags to describe the character's appearance and clothing. |
| Lucid or Studio | A woman with green eyes and long black hair tied into a ponytail is wearing a red dress. | Connects the character's features and clothing into one clear description, making it easier for the model to understand which attributes belong to the subject. |
The Natural Language version makes the relationships between the details clearer.
Describing an Action
| Prompt Type | Prompt | What It Shows |
|---|---|---|
| Lab Engine | woman, standing, holding sword | Uses separate tags to describe the subject and action. |
| Lucid or Studio | A woman stands while holding a sword in her right hand. | Clearly explains who is performing the action and how the object is being held. |
| Lab Engine | woman, motorcycle, city | Lists the main subject, object, and environment without defining their positions. |
| Lucid or Studio | A woman stands on the left side of the image. A motorcycle is parked behind her on the right, with the city skyline visible in the distant background. | Clearly defines the position and relationship between the character, motorcycle, and background. |
Natural Language is especially useful when several elements need specific positions.
Describing More Complex Scenes
| Prompt Type | Prompt | Why It Works |
|---|---|---|
| Lab Engine | two women, cafe, sitting, table, coffee | Lists the main subjects, setting, action, and objects as separate tags. |
| Lucid or Studio | Two women sit across from each other at a small cafe table. Each woman has a cup of coffee in front of her. | Clearly explains who is doing what, where they are positioned, and how the objects relate to each character. |
The second prompt explains the relationship between the people, table, and objects instead of simply listing them.
Prompt Weighting: Lab vs Natural Language
Prompt weighting is another important difference between Lab Engines and Natural Language Engines.
Prompt Weighting in Lab Engines
Some Lab Engines support syntax that increases or decreases the importance of particular prompt tags.
Common formats include:
(red dress)
or:
(red dress:1.2)
A value around 1.0 represents normal emphasis. Increasing the value can make an Engine prioritize the concept more strongly.
Example:
woman, black hair, (red leather jacket:1.2), city street, night
In this example, additional emphasis is being placed on the red leather jacket.
Avoid applying strong weights to many different tags at the same time. If several concepts are all heavily weighted, they can begin competing with each other and reduce generation quality.
As a general rule, use weighting only when an important concept is repeatedly being ignored.
Emphasis in Lucid and Studio
Lucid and Studio should primarily be guided through language rather than weighting syntax.
| Prompt Type | Prompt | Why It Works |
|---|---|---|
| Lab Engine Weighting | (bright red dress:1.3) | Uses syntax-based weighting to increase emphasis on a specific tag. |
| Lucid or Studio | The character must be wearing a bright red dress. | Uses direct Natural Language to make the requirement explicit. |
| Lucid or Studio — Added Emphasis | Her bright red dress should be the dominant color in her outfit. | Adds context so the model understands the dress should be visually prominent. |
| Lucid or Studio — Preservation | Keep the dress bright red and do not change its color. | Clearly tells the model to preserve the specified color during generation or editing. |
Natural Language models can interpret the importance of a detail from the way the instruction is written.
Note: Do not assume Lab syntax such as (prompt:1.3) behaves the same way in Lucid or Studio. Use clear Natural Language instructions unless a particular Engine specifically supports prompt-weight syntax.
Building a Natural Language Prompt
A useful Natural Language prompt can be built from several visual elements.
You do not need to include every element in every prompt.
A useful structure is:
Subject + Appearance + Action + Costume + Props + Environment + Camera + Lighting + Style
For example:
A red-haired female knight wearing weathered silver plate armor stands in a misty pine forest while holding a longsword. Frame her in a full-body three-quarter view from slightly below eye level. Soft morning light filters through the trees behind her. Use a cinematic dark-fantasy style.
The following sections explain the different elements you can describe.
Character or Subject
Start by defining the main subject.
This can include:
- Number of characters
- Character type
- Hair
- Facial appearance
- Expression
- General appearance
- Distinguishing features
Example:
A woman with shoulder-length black hair and green eyes smiles gently at the camera.
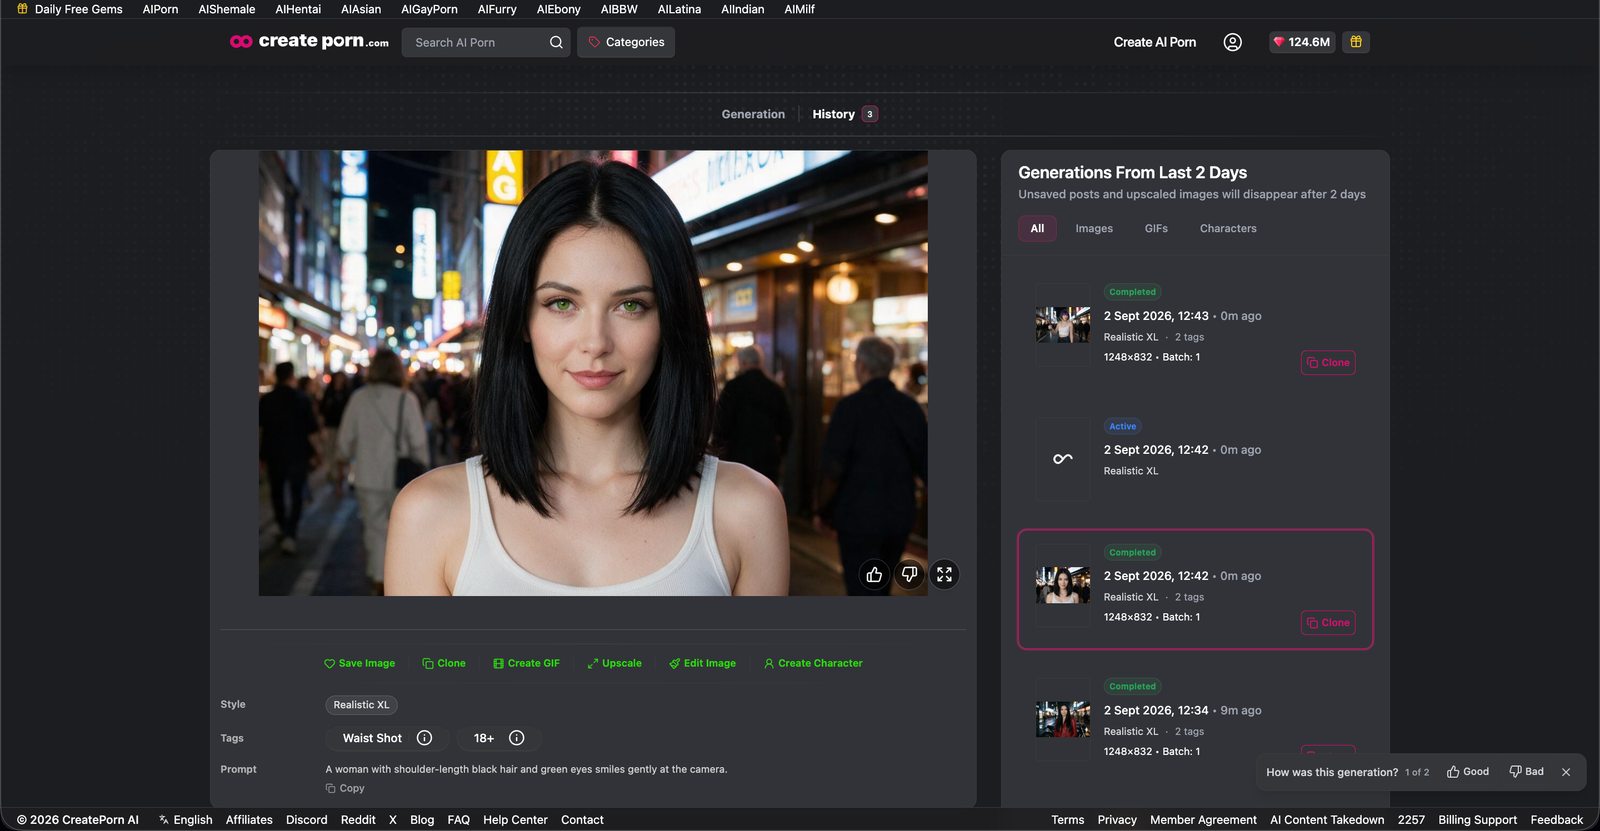
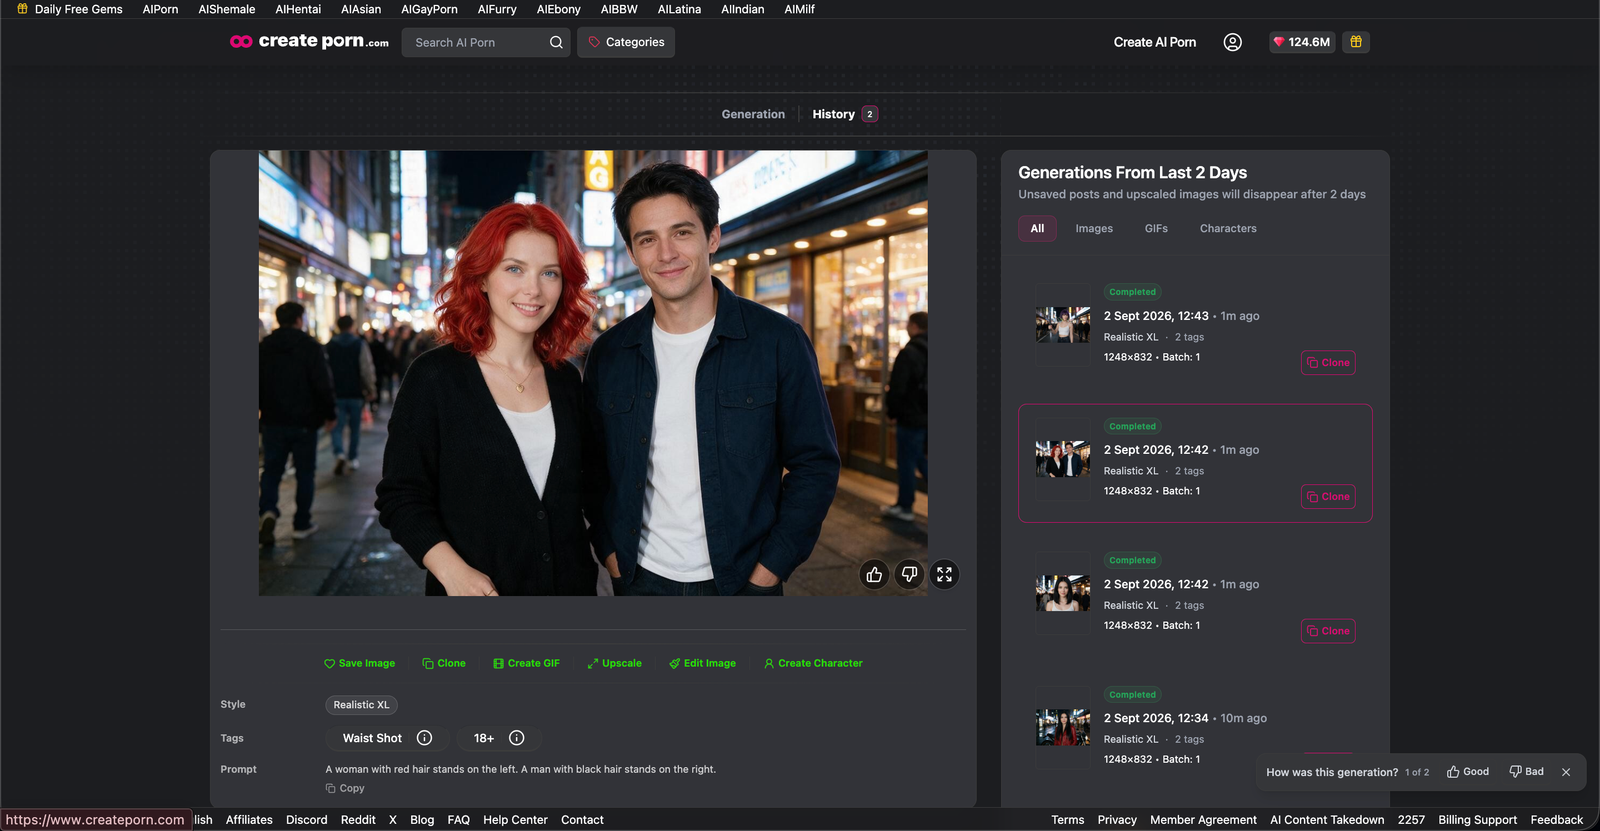
If multiple characters appear in the scene, make it clear which description belongs to which character.
Example:
A woman with red hair stands on the left. A man with short black hair stands on the right.
Pose and Action
Describe what the character is doing.
Useful actions include:
- Standing
- Sitting
- Walking
- Running
- Looking
- Reaching
- Holding
- Leaning
- Turning
- Interacting with another character
- Interacting with an object
Instead of:
woman, sword
write:
A woman holds a sword in her right hand with the blade pointed toward the ground.
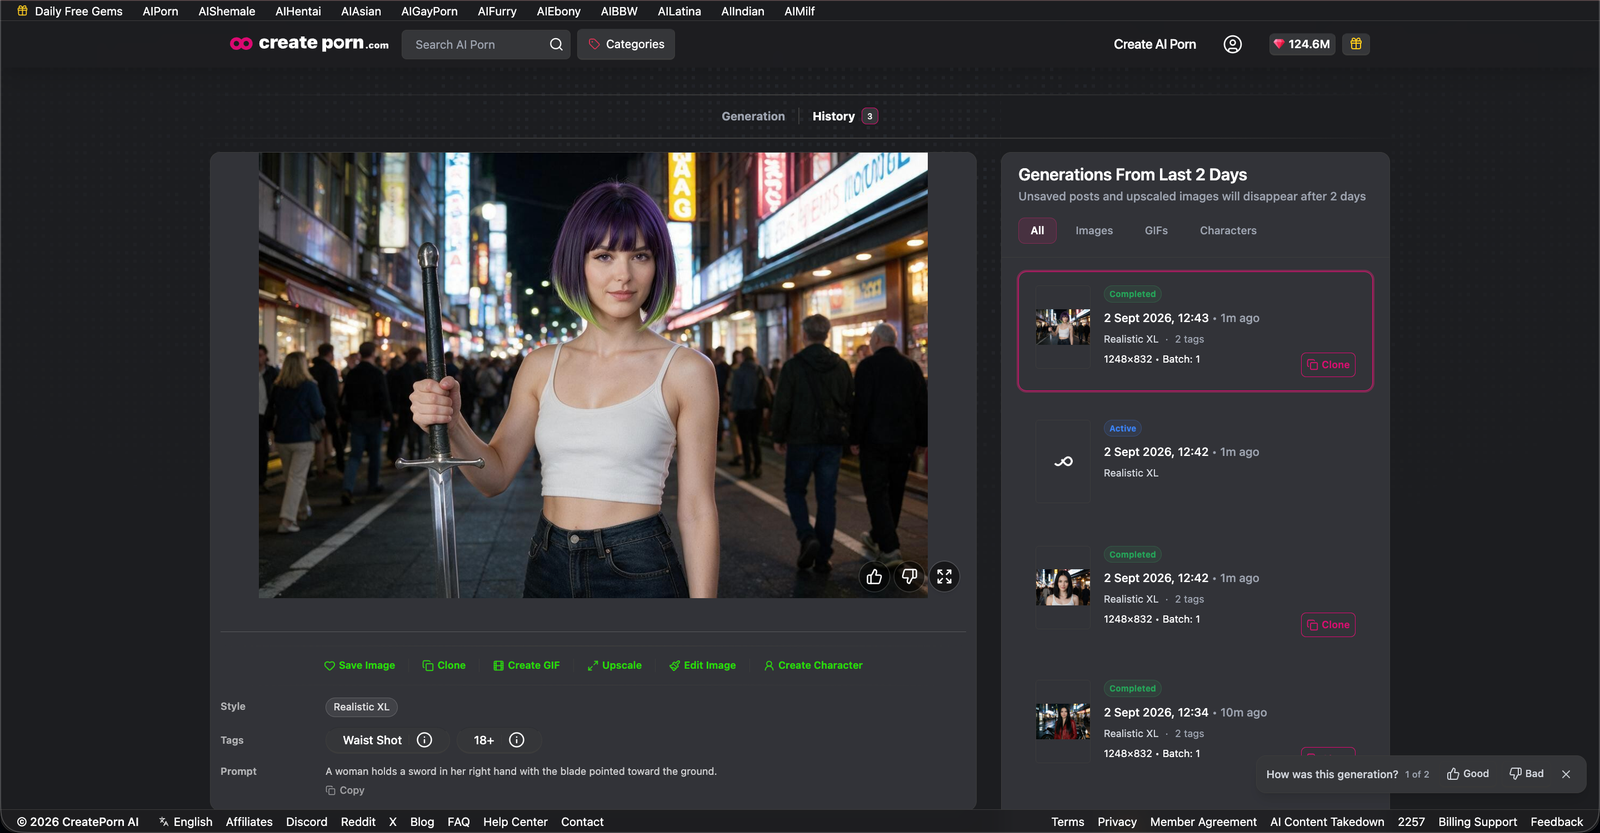
Clear relationships make it easier for Lucid and Studio to understand the action.
Costume and Clothing
You can describe clothing using normal visual terms.
Include details such as:
- Clothing type
- Color
- Material
- Pattern
- Fit
- Layers
- Footwear
- Jewelry
- Accessories
Example:
She wears a fitted brown leather jacket with silver zippers, black jeans, and dark leather boots.
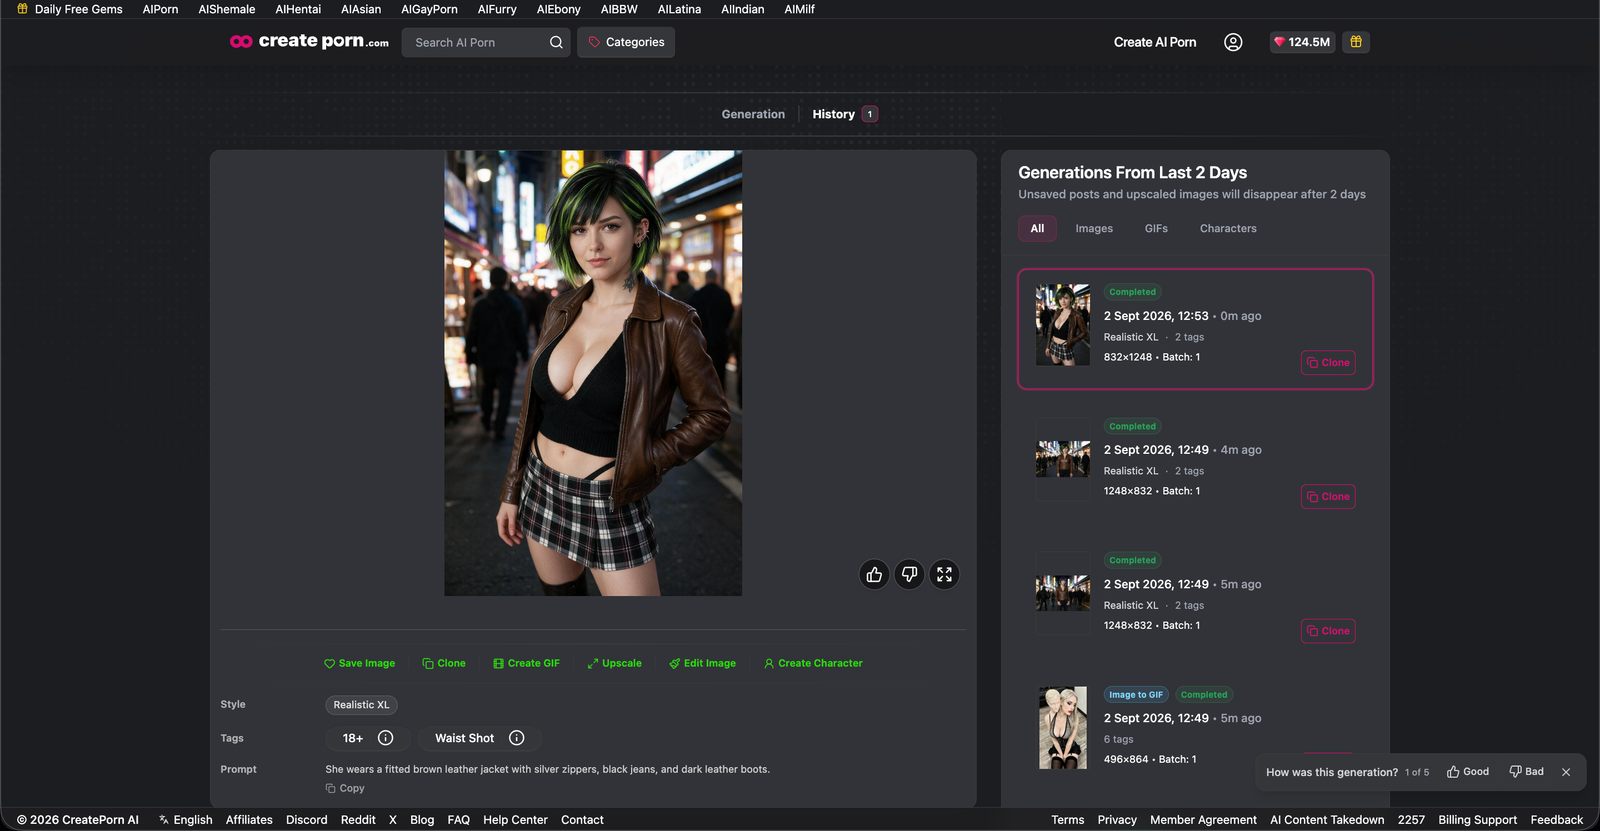
Adding material information can also help define how the clothing should interact with light.
Props and Objects
Props are objects that appear in the scene or interact with the character.
Examples include:
- Swords
- Phones
- Books
- Bags
- Furniture
- Vehicles
- Food
- Tools
- Flowers
- Signs
Be specific about where the object should appear.
Instead of:
Add a sword.
try:
Place a silver longsword in the character's right hand.
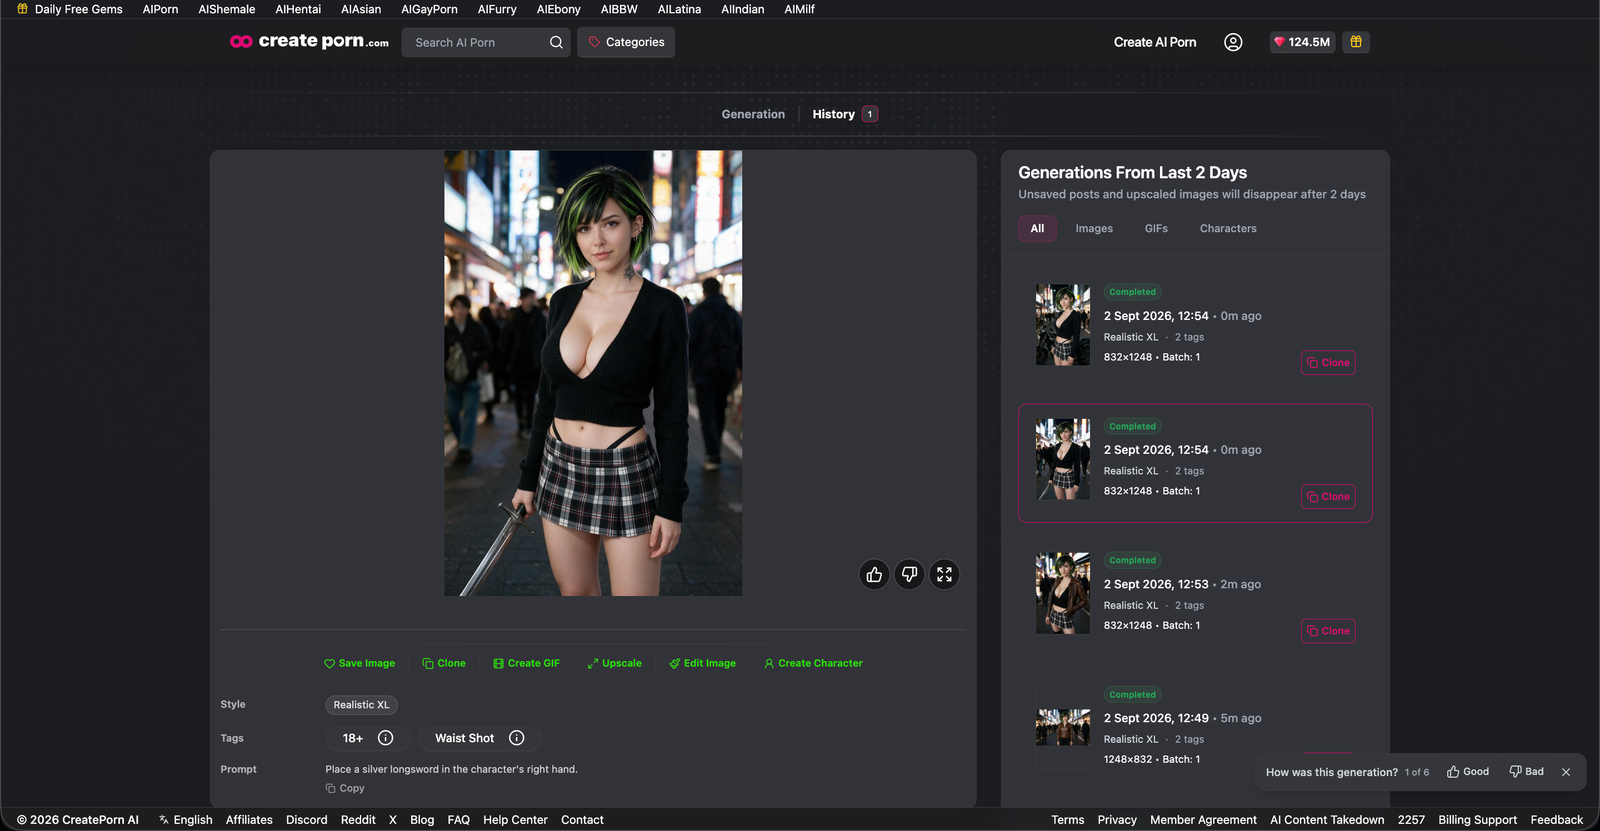
Or:
A black motorcycle is parked directly behind the character.
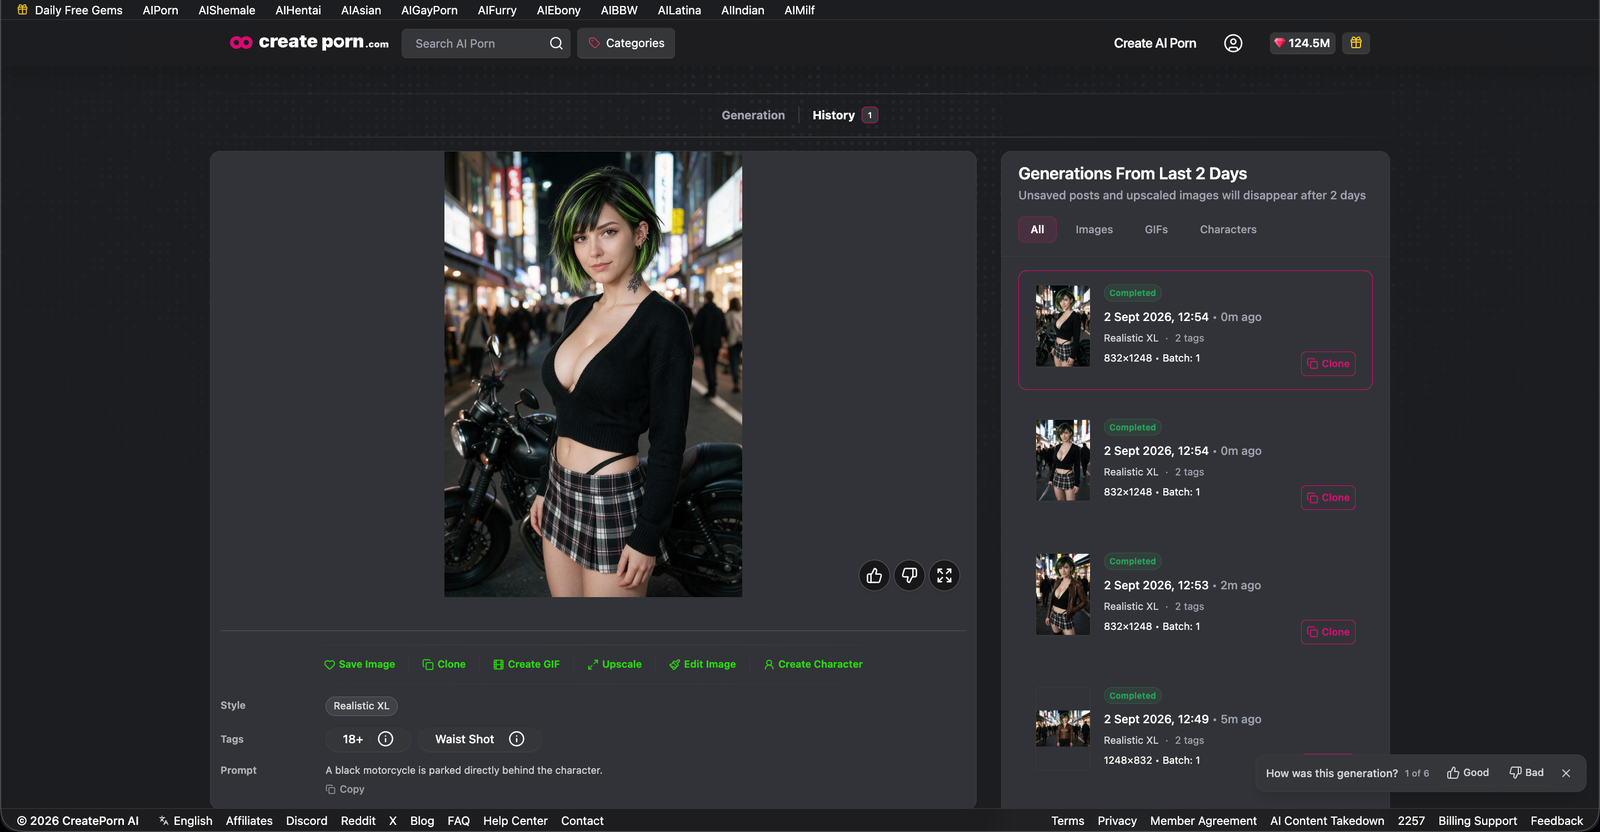
Environment
Describe where the scene takes place.
Examples include:
- Bedroom
- Cafe
- Forest
- Beach
- City street
- Castle
- Classroom
- Office
- Spaceship
- Fantasy landscape
You can add environmental details when they are important.
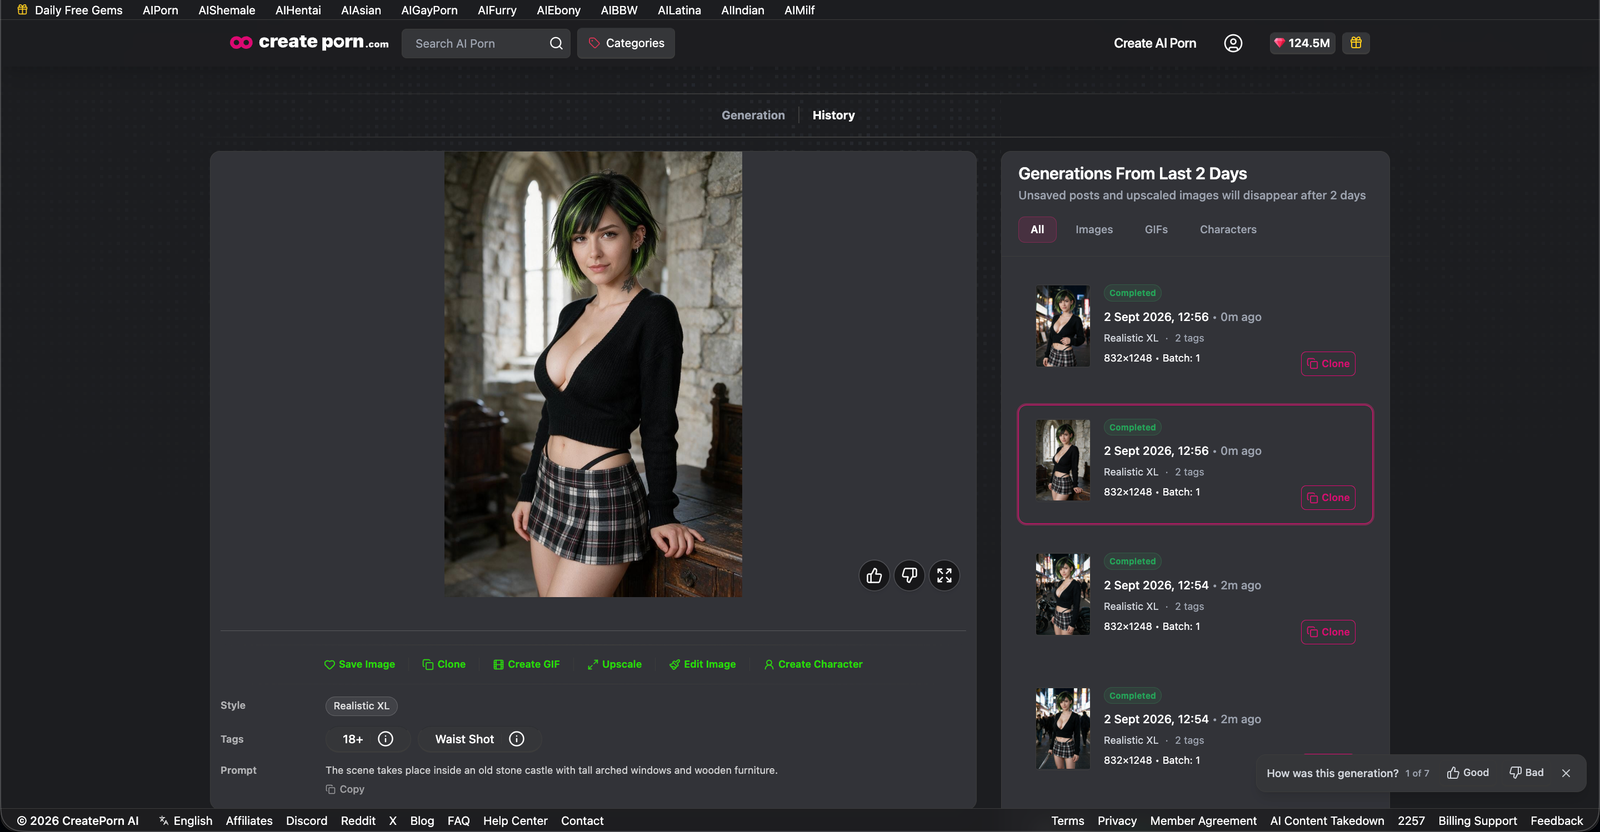
Example:
The scene takes place inside an old stone castle with tall arched windows and wooden furniture.
Background
The background can be described separately from the main environment.
Example:
Keep the character in the foreground with a blurred city skyline in the distant background.
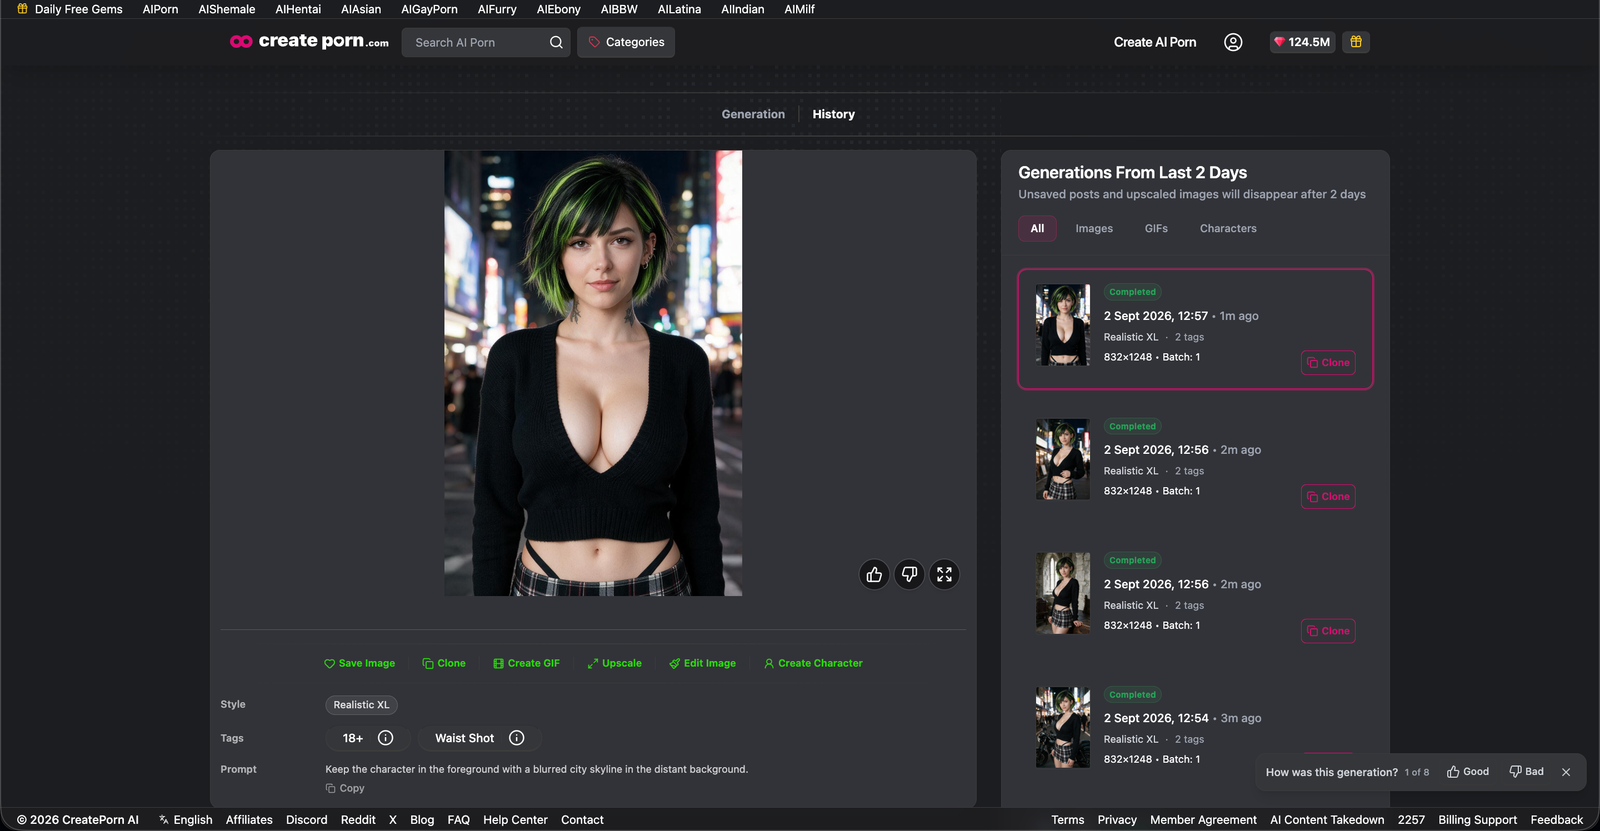
This is especially useful when you want the subject to remain the visual focus.
Weather and Time
Lucid can interpret environmental conditions naturally.
You can describe:
- Rain
- Snow
- Fog
- Wind
- Sunshine
- Overcast skies
- Morning
- Midday
- Sunset
- Night
- Seasons
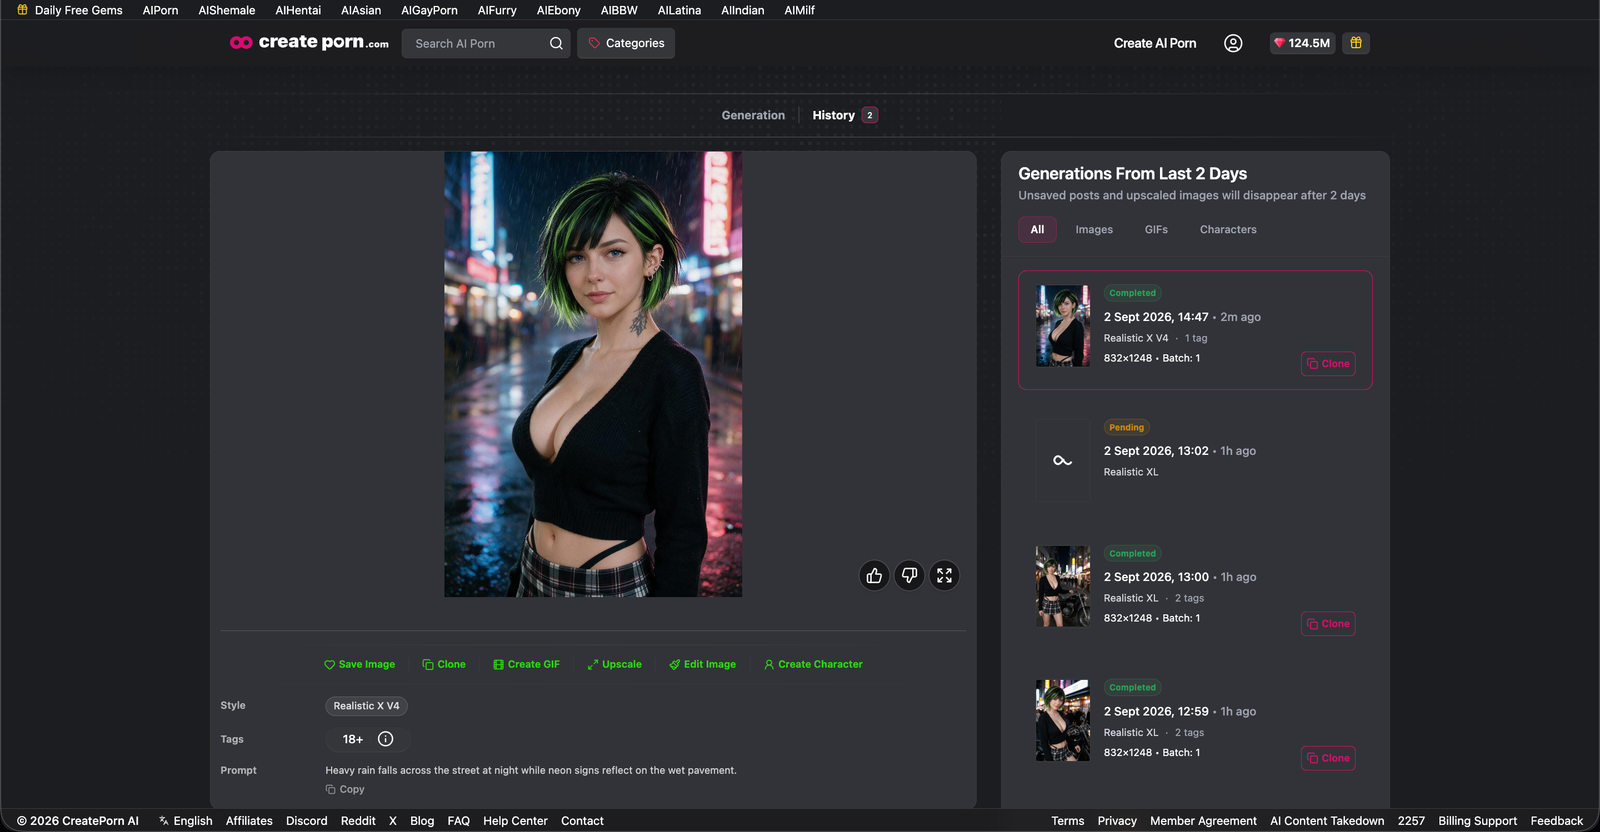
Example:
Heavy rain falls across the street at night while neon signs reflect on the wet pavement.
Composition and Position
Natural Language is particularly useful for controlling relationships between subjects and objects.
Useful terms include:
- Left
- Right
- Center
- Above
- Below
- Behind
- In front of
- Beside
- Between
- Foreground
- Background
- Distant
- Upper-left
- Lower-right
Example:
Position the character on the left side of the frame. Place the motorcycle behind her on the right.
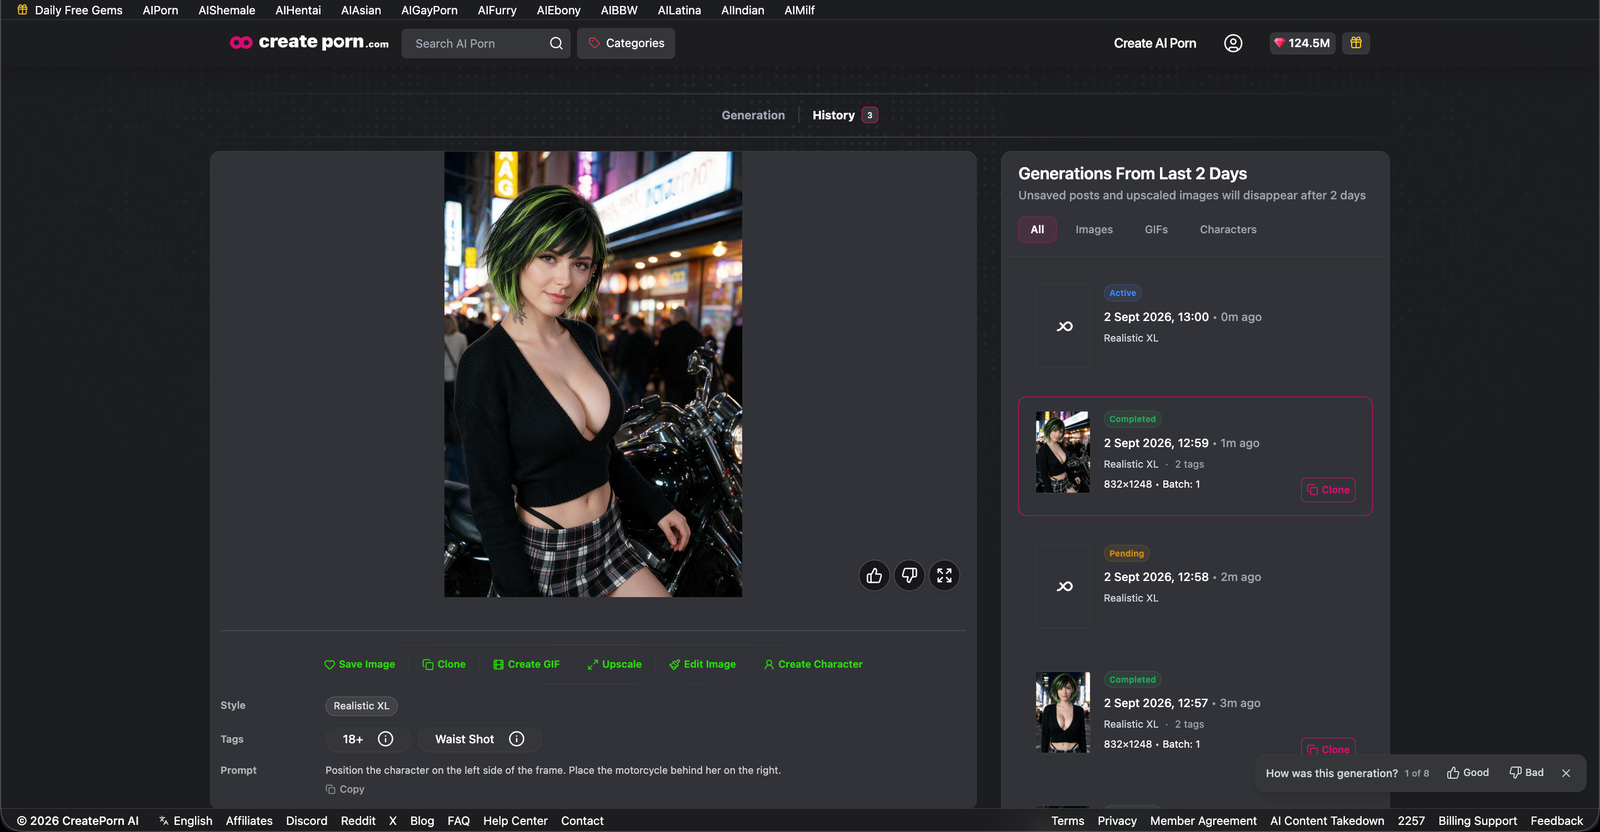
When several subjects appear, use explicit positions instead of assuming the model will determine where everything belongs.
Camera and Framing
You can describe the camera similarly to giving instructions to a photographer.
Shot Size
Common descriptions include:
- Extreme close-up
- Close-up
- Headshot
- Medium shot
- Medium-full shot
- Full-body shot
- Wide shot
- Extreme wide shot
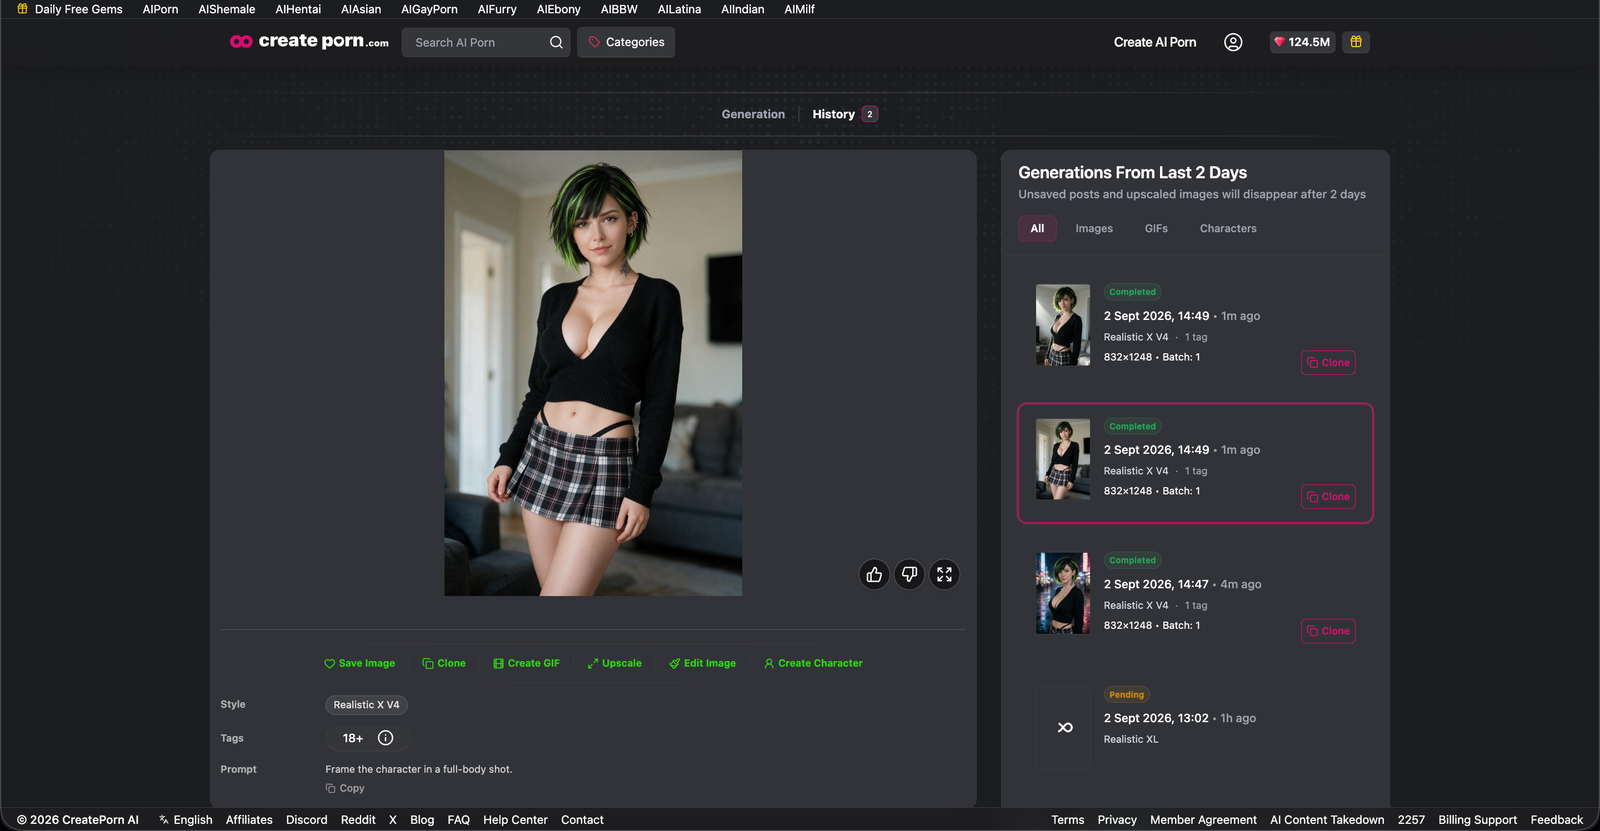
Example:
Frame the character in a full-body shot.
Camera Angle
Useful instructions include:
- Eye level
- Low angle
- High angle
- Overhead
- Bird's-eye view
- Side view
- Three-quarter view
- Rear view
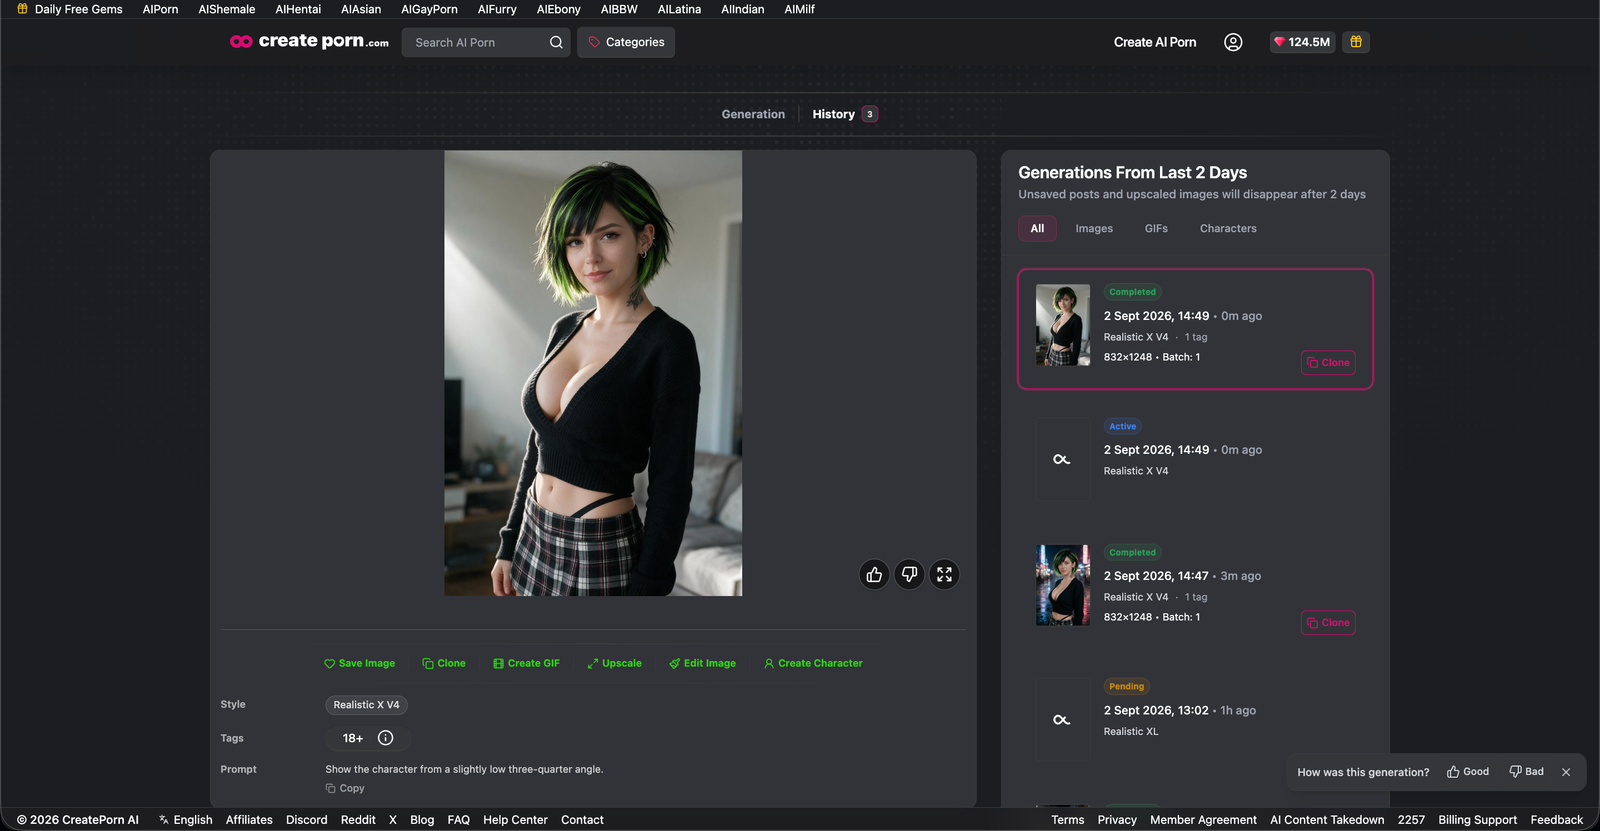
Example:
Show the character from a slightly low three-quarter angle.
Lens and Photography Language
You can also use conventional photography terms when they are useful.
Examples include:
- Wide-angle lens
- 35mm lens
- 50mm lens
- 85mm portrait lens
- Telephoto lens
- Macro photography
- Anamorphic look
Avoid adding technical camera details unless they meaningfully affect the image you want.
Focus and Depth of Field
You can specify which parts of the image should remain sharp.
Examples include:
Keep the character in sharp focus with the background softly blurred.
Use a shallow depth of field.
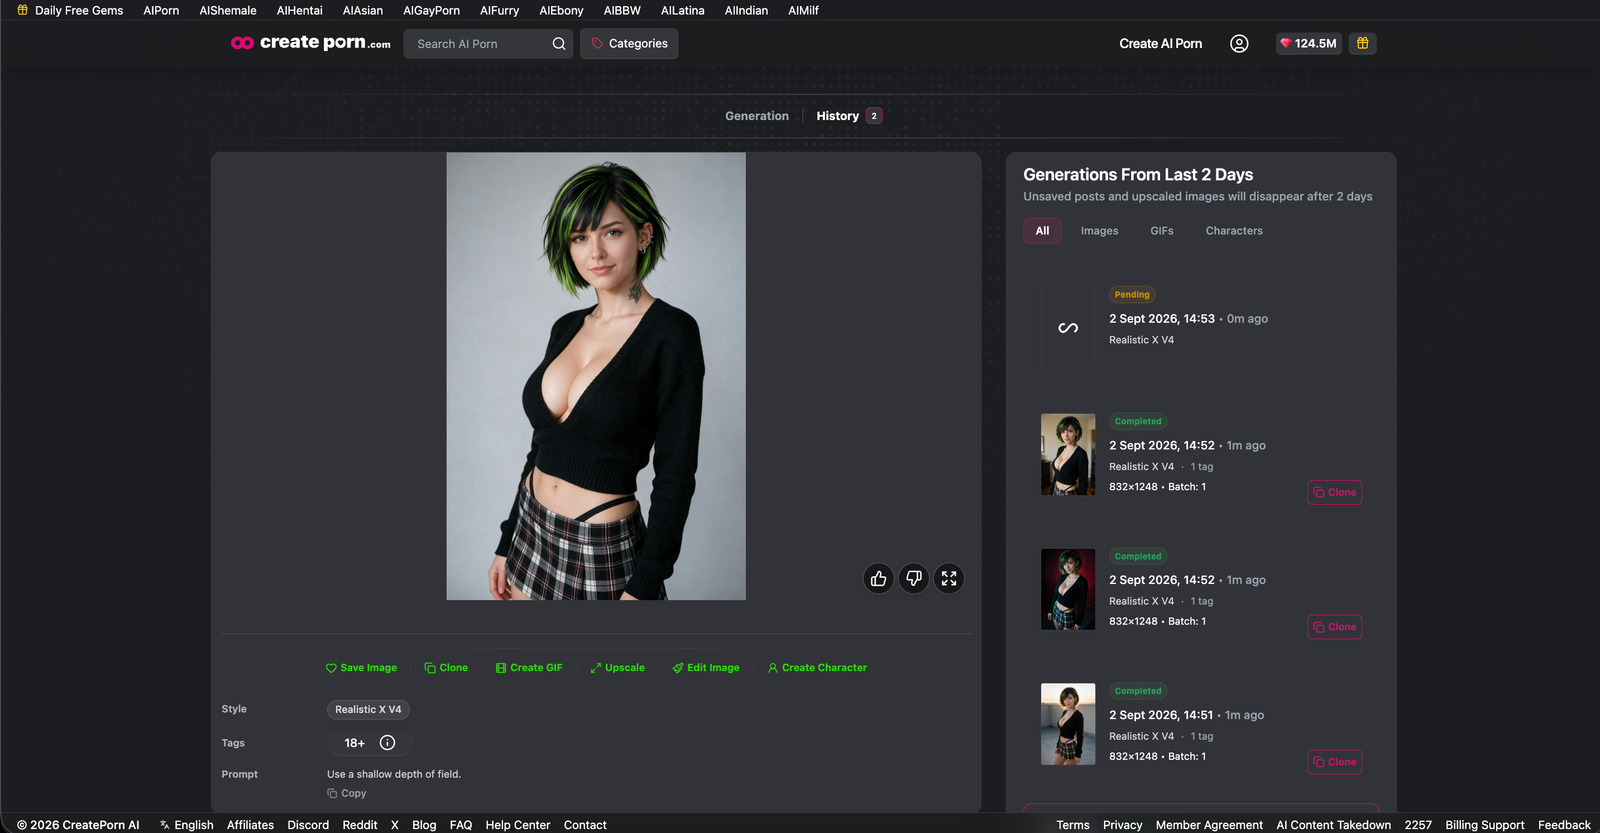
This can help establish visual hierarchy.
Lighting
Lighting can significantly change the appearance and mood of an image.
You can describe:
- Natural daylight
- Studio lighting
- Window light
- Golden-hour light
- Rim lighting
- Backlighting
- Side lighting
- Neon lighting
- Candlelight
- Volumetric light
- Soft shadows
- Hard shadows
Example:
Warm sunset light comes from behind the character, creating a subtle rim light around her hair.
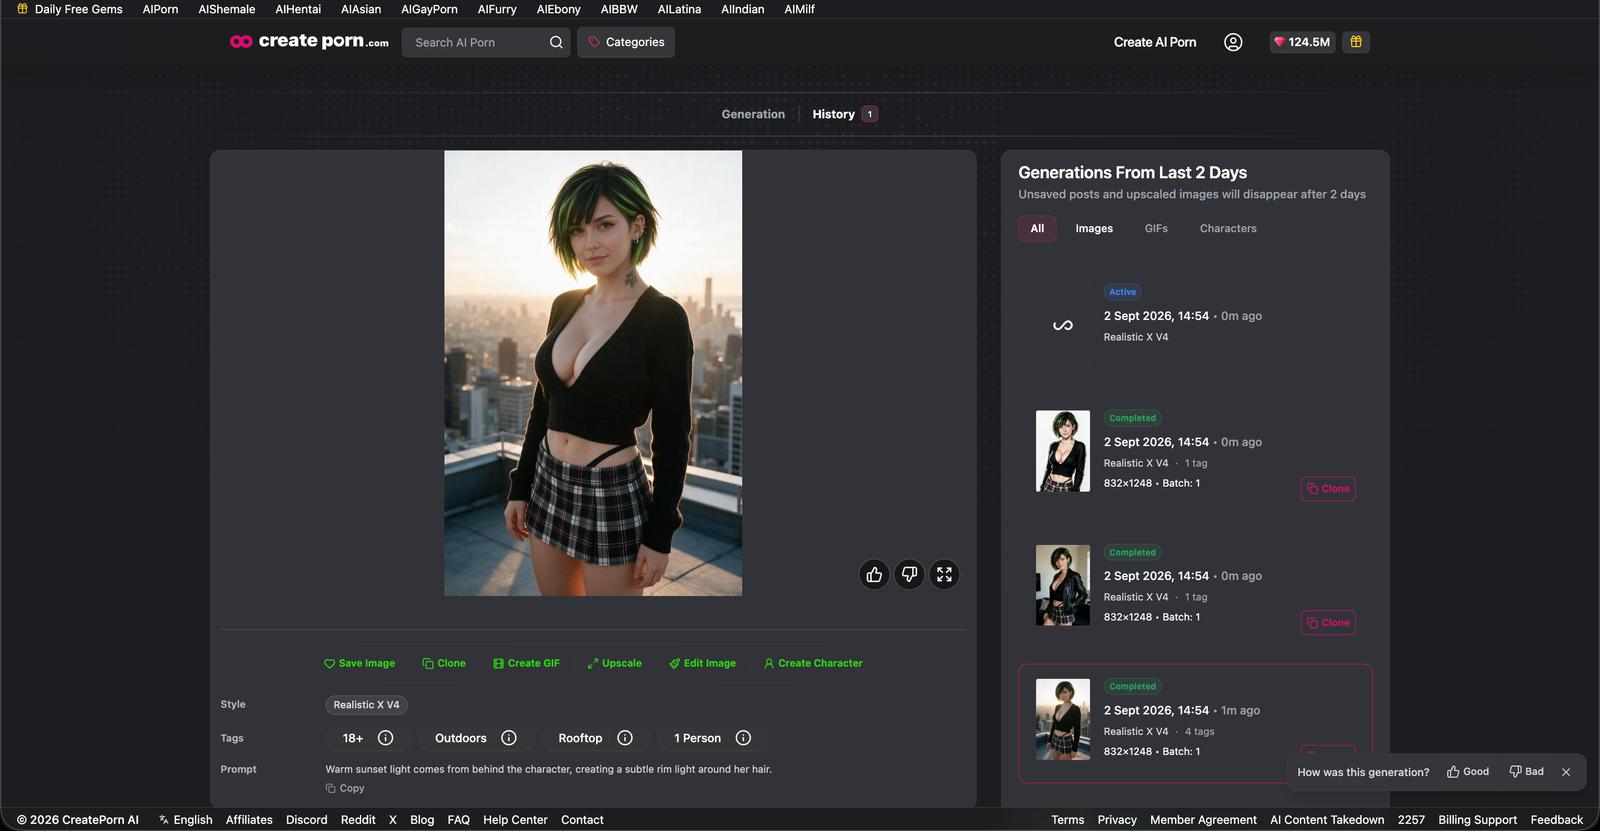
Specific lighting descriptions usually provide more control than simply writing:
beautiful lighting
Color
You can describe individual colors or an overall color palette.
Example:
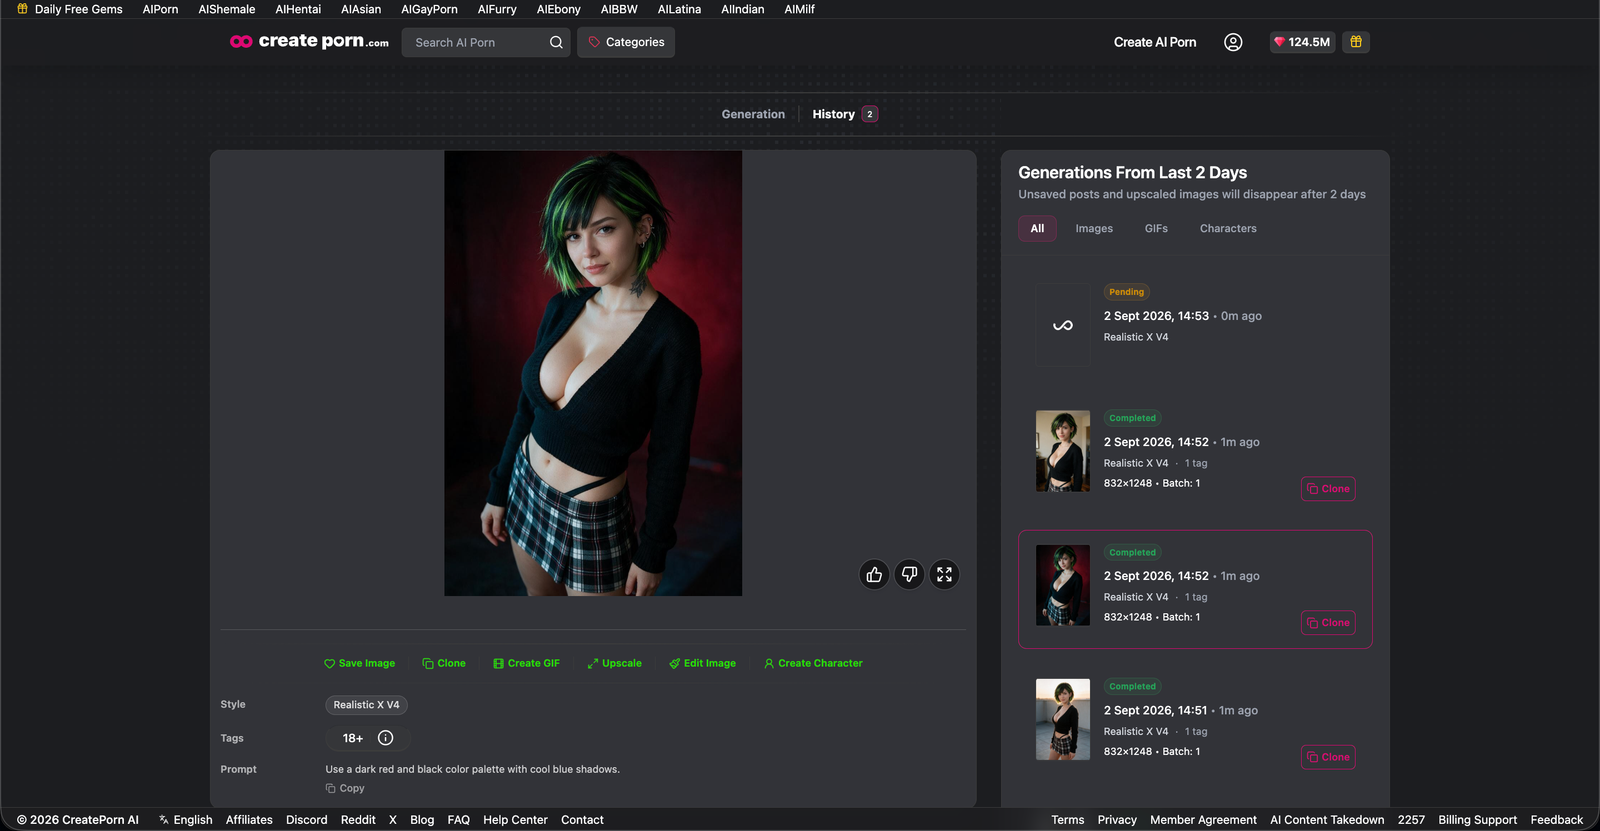
Use a dark red and black color palette with cool blue shadows.
Or:
Give the room warm cream-colored walls and dark wooden furniture.
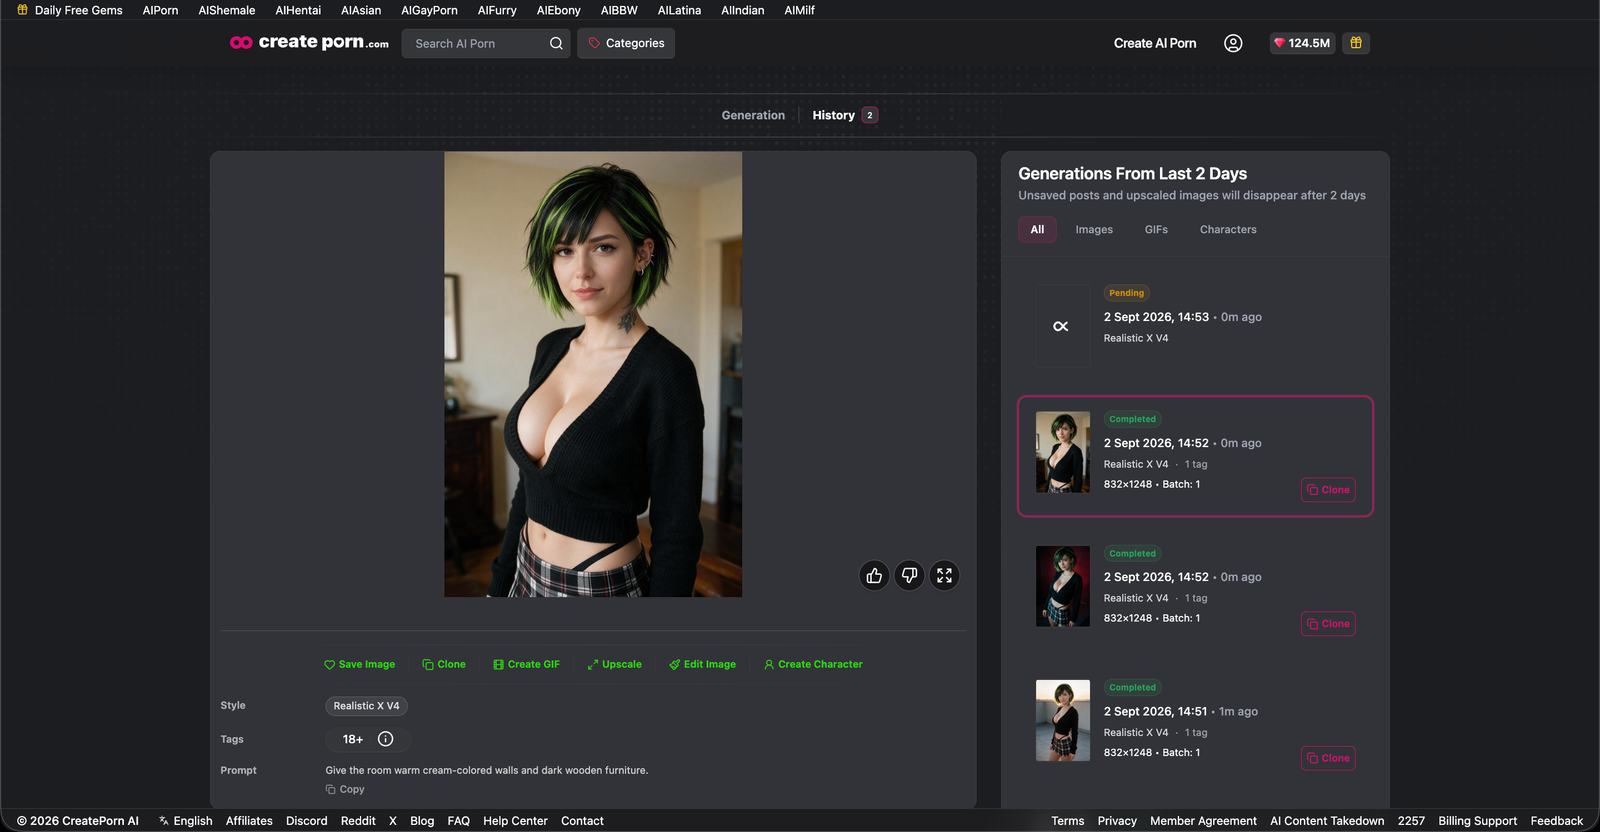
Color descriptions can also be connected directly to specific objects.
Materials and Textures
Material descriptions help the model understand how surfaces should appear.
Examples include:
- Leather
- Silk
- Denim
- Metal
- Glass
- Wood
- Ceramic
- Stone
- Plastic
- Velvet
You can also describe surface properties:
- Glossy
- Matte
- Reflective
- Transparent
- Translucent
- Rough
- Polished
- Wet
- Worn
Example:
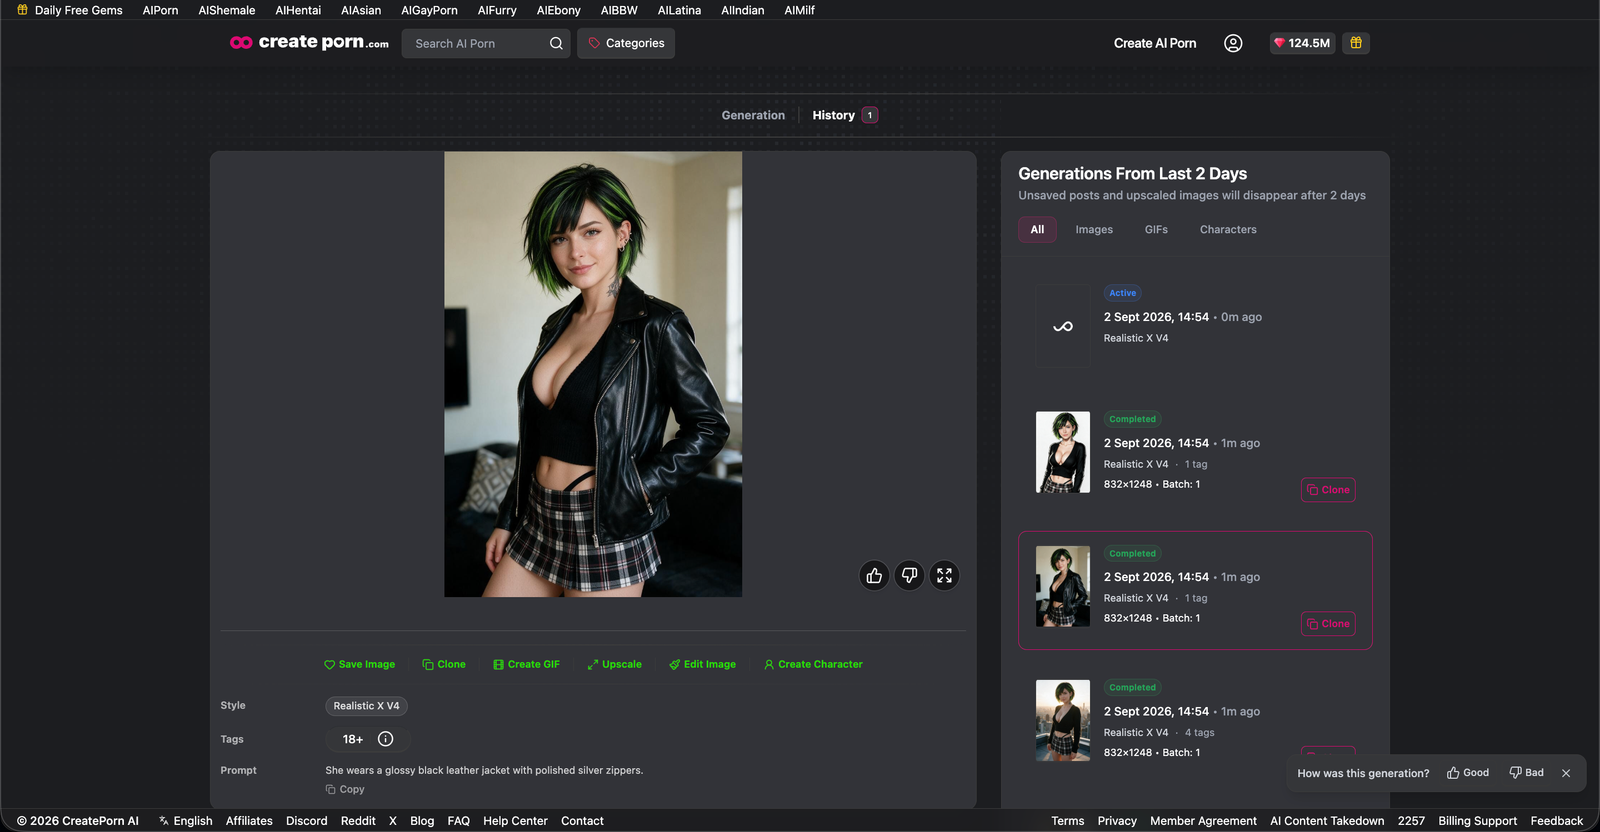
She wears a glossy black leather jacket with polished silver zippers.
Style
You can describe the overall visual medium or style directly.
Examples include:
- Photography
- Cinematic
- Anime
- Manga
- Comic illustration
- Oil painting
- Watercolor
- Pencil sketch
- 3D render
- Fantasy concept art
- Editorial photography
- Film noir
Example:
Create the scene as a detailed manga illustration with clean ink lines and dramatic shading.
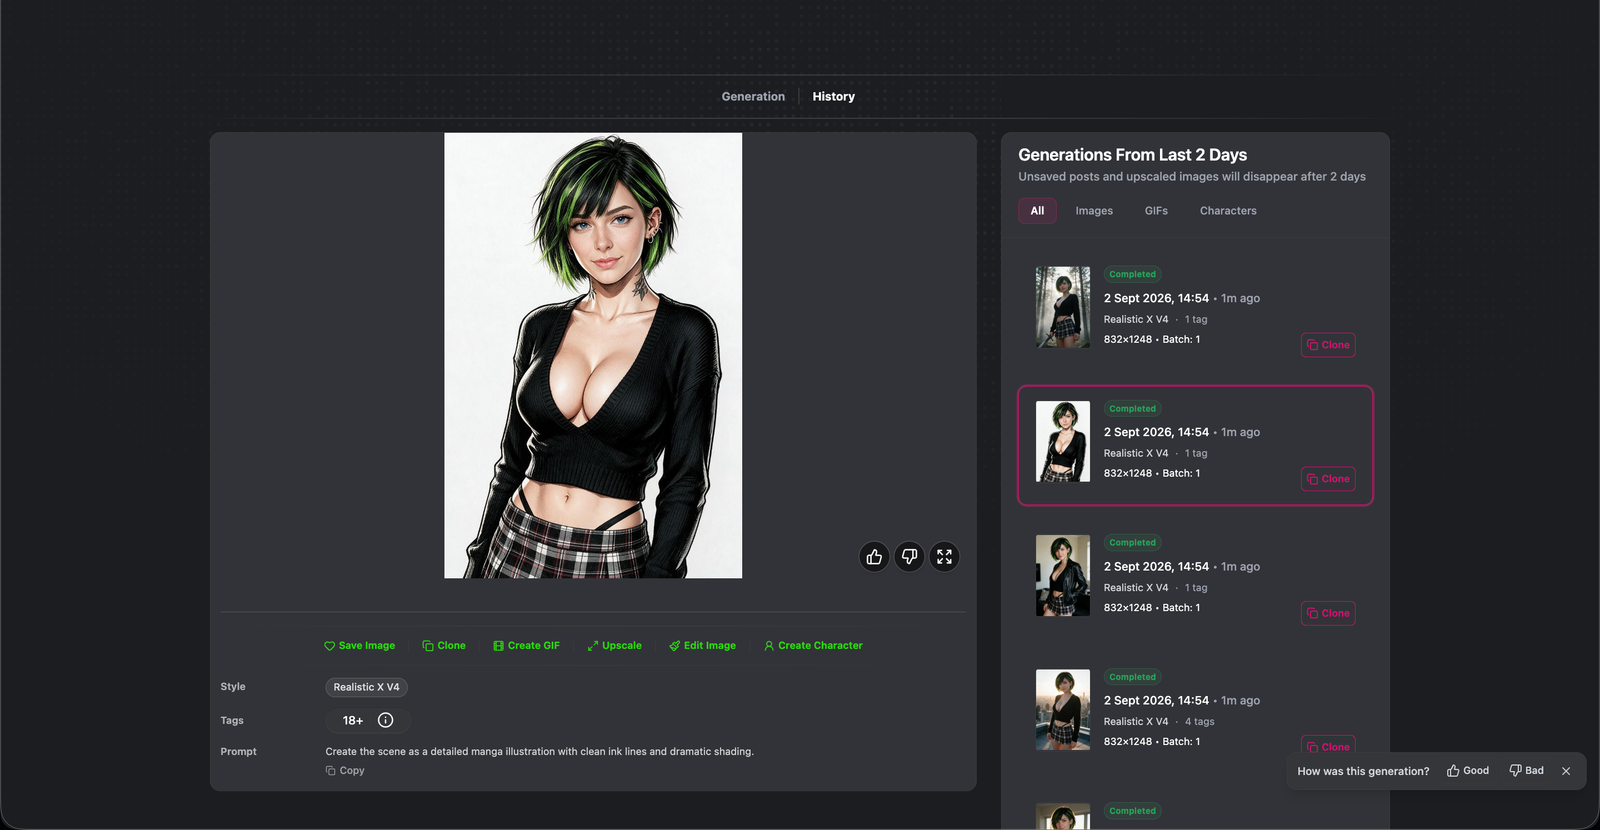
Try to use clear style descriptions instead of stacking many styles that contradict each other.
Text-to-Image Prompting with Lucid
Text-to-Image starts without a reference image. Lucid builds the scene from your written prompt.
A useful structure is:
WHO + WHAT + WHERE + CAMERA + LIGHTING + STYLE
| Step | Prompt | Purpose |
|---|---|---|
| Start With the Main Subject | A red-haired female knight wearing silver armor stands in a forest. | Establishes the main character and core scene first. |
| Add Action or Props | A red-haired female knight wearing silver armor stands in a forest while holding a longsword in her right hand. | Adds what the character is doing and how she interacts with an object. |
| Add the Environment | A red-haired female knight wearing weathered silver armor stands in a misty pine forest while holding a longsword in her right hand. | Adds more specific environmental and visual detail. |
| Add the Camera | Frame her in a full-body three-quarter shot from slightly below eye level. | Defines the framing and camera angle. |
| Add Lighting and Style | Soft morning light filters through the trees behind her. Use a cinematic dark-fantasy style with realistic metal and fabric textures. | Defines the lighting, mood, and overall visual style. |
Complete Prompt
A red-haired female knight wearing weathered silver plate armor stands in a misty pine forest while holding a longsword in her right hand. Frame her in a full-body three-quarter shot from slightly below eye level. Soft morning light filters through the trees behind her. Use a cinematic dark-fantasy style with realistic metal and fabric textures.
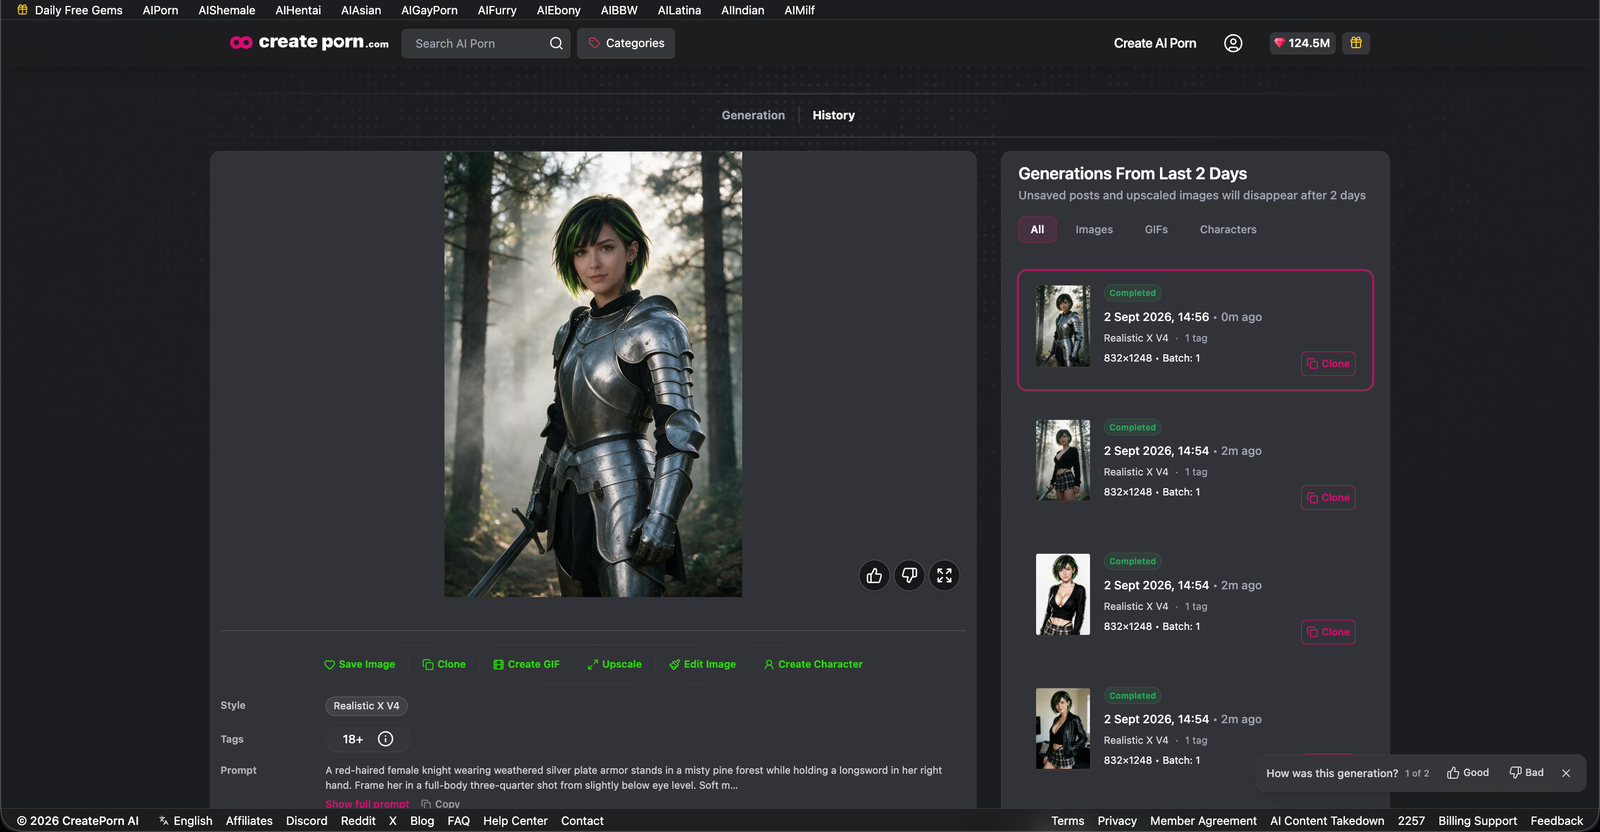
Combines all major prompt elements into one clear Natural Language instruction.
Common Text-to-Image Commands
Note: Image Edit/Magic Edit and Reference Images are unavailable as of September 2nd, 2026.
Natural Language prompts do not require a special command at the beginning, but several common instructions can help communicate your goal.
| Command | When to Use It | Example |
|---|---|---|
| Create | Use for general image generations. | Create a cinematic portrait of a warrior standing in a snowy forest. |
| Generate | Use as another general-purpose instruction for creating an image. | Generate a fantasy illustration of an ancient city built into a mountain. |
| Show | Use when describing a scene or action directly. | Show a woman walking through a brightly lit city at night. |
| Depict | Use for more descriptive or scene-focused generations. | Depict a medieval marketplace crowded with merchants and wooden stalls. |
| Design | Use when creating a specific visual concept, character, object, or design. | Design a futuristic armored character wearing white and gold equipment. |
| Illustrate | Use for drawn, painted, comic, manga, or illustrated styles. | Illustrate a warrior standing at the entrance of an ancient temple. |
| Render | Use for 3D, product, architectural, or realistic visualization. | Render a futuristic motorcycle inside a clean photography studio. |
Note: You do not need to start every prompt with a command. You can simply describe the intended image.
Using a Reference Image with Lucid
Lucid can also use a single reference image together with a Natural Language prompt.
The reference provides existing visual information, while your prompt explains how Lucid should use or modify it.
The most important rule is:
Tell Lucid what you want the reference image to be used for.
A reference could be used for:
- Character appearance
- Pose
- Clothing
- Composition
- Style
- Color palette
- Environment
- Base image editing
Do not assume Lucid automatically knows which part of the reference is important to you.
The Reference Prompt Formula
A useful structure for reference-image prompts is:
Reference + Change + Preserve + Match
| Step | What to Do | Example |
|---|---|---|
| Reference | Tell Lucid how to use the image. | Use the reference image as the base image. |
| Change | Clearly identify what should be modified. | Replace the character's white jacket with a fitted red leather jacket. |
| Preserve | Explain which elements should remain the same. | Keep her face, hairstyle, pose, camera angle, and background unchanged. |
| Match | Explain how the new element should fit into the existing image. | Match the new jacket's shadows and highlights to the existing lighting. |
Complete Prompt
Use the reference image as the base image. Replace the character's white jacket with a fitted red leather jacket with silver zippers. Keep her face, hairstyle, body pose, camera angle, and background unchanged. Match the new jacket's shadows, highlights, perspective, and overall lighting to the existing scene.
Common Reference Image Commands
The following commands are useful when editing a reference image.
| Command | When to Use It | Example |
|---|---|---|
| Keep | Use when something should remain unchanged. | Keep the character's face and hairstyle unchanged. |
| Preserve | Use when an important visual feature should remain consistent. | Preserve the original composition and lighting. |
| Change | Use when modifying an attribute. | Change the jacket from blue to red. |
| Change Only | Use when you want to limit the edit to one specific element. | Change only the character's hairstyle. Keep everything else unchanged. |
| Replace | Use when swapping one element for another. | Replace the wooden chair with a black leather sofa. |
| Add | Use to introduce a new element. | Add a silver sword to the character's right hand. |
| Remove | Use when an existing object should disappear. | Remove the red backpack from the floor behind the character. |
| Move / Reposition | Use to change where a character or object appears. | Move the character slightly toward the left side of the image. |
| Transform | Use when making a larger change to an object, character, or environment. | Transform the sunny forest into a snowy winter landscape. |
| Match | Use when newly generated content should visually integrate with the original image. | Match the new object to the perspective, lighting, and shadows of the original scene. |
| Apply | Use for visual treatments or stylistic changes. | Apply a watercolor illustration style while preserving the original composition. |
| Convert | Use when changing the visual medium or format. | Convert the scene into a black-and-white manga illustration. |
Refer to Characters and Objects Clearly
Avoid vague instructions when multiple objects appear in the image.
A useful pattern is:
Identify the target + describe the instruction
| Clarity | Instruction | Why |
|---|---|---|
| Unclear | Change it to red. | Lucid may not know what it refers to. |
| Clear | Change the woman's jacket from black to red. | Clearly identifies the object being modified and the intended change. |
| Unclear | Remove the object behind her. | The prompt does not clearly identify which object should be removed. |
| Clear | Remove the wooden chair directly behind the character. | Clearly identifies the exact object and its location. |
The more clearly you identify the target, the easier the instruction is to interpret.
Tell Lucid What Should Not Change
When editing a reference image, explaining what should remain unchanged can reduce unwanted changes.
Instead of:
Change her hairstyle to a ponytail.
try:
Change her hairstyle to a high ponytail. Keep her face, expression, clothing, pose, camera angle, lighting, and background unchanged.
This does not guarantee that every untouched pixel will remain identical. AI image editing still regenerates parts of the image, so small differences may occasionally appear.
The goal of preservation instructions is to tell Lucid which parts of the image should receive the least change.
Describe the Finished Result
Try to describe exactly what you want instead of asking the Engine to make a vague improvement.
A useful rule is:
Describe what the finished image should look like.
| Quality Level | Instruction | Why |
|---|---|---|
| Too Vague | Make the outfit better. | Does not explain what should actually change. |
| Better | Replace the outfit with a fitted black leather jacket, dark jeans, and black boots. | Clearly describes the desired clothing changes. |
| Too Vague | Improve the lighting. | Does not explain what kind of lighting is wanted. |
| Better | Add soft golden-hour light from the left side of the character with a subtle rim light around the hair. | Clearly describes the lighting direction, mood, and effect. |
| Too Vague | Make the background nicer. | Does not explain what kind of background should replace the current one. |
| Better | Replace the plain wall with a modern apartment interior featuring large windows and a softly blurred city skyline. | Clearly describes the new background and the intended visual style. |
Prefer Positive Instructions
Whenever possible, describe what you want to see.
Instead of:
no ugly background, no bad lighting, no weird colors
try:
Use a clean studio background with soft neutral lighting and natural colors.
Negative instructions can still be useful when you need a specific constraint.
Examples:
Do not change the character's face.
No other people should appear in the background.
Keep the image free of visible text.
Use these instructions for clear restrictions rather than filling the prompt with long lists of unwanted concepts.
Use Clear Spatial Language
Natural Language Engines can use positioning words to understand how elements should relate to each other.
Useful terms include:
- Left
- Right
- Center
- Above
- Below
- Behind
- In front
- Beside
- Between
- Foreground
- Background
- Distant
Example:
Place the woman on the left side of the frame. Position the motorcycle behind her on the right, with the city skyline visible in the distant background.
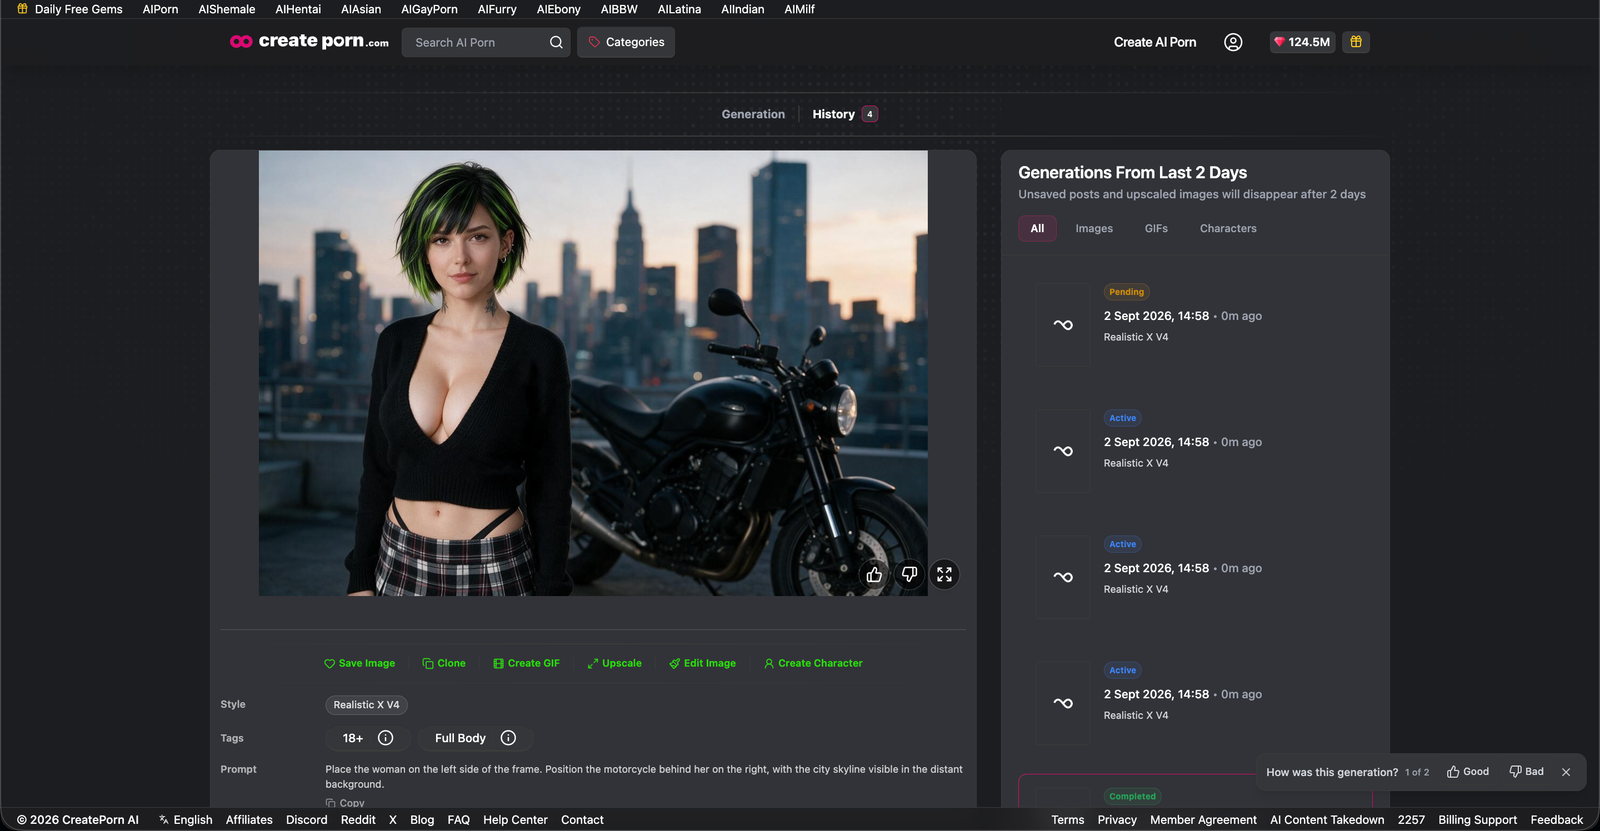
This is especially helpful when your scene contains multiple subjects or objects.
Describe Relationships, Not Just Objects
A list tells the Engine what should exist.
Natural Language can also tell it how those things interact.
| Version | Prompt | Why It Works |
|---|---|---|
| Instead of | woman, umbrella, rain | Lists the elements but does not explain how they relate to each other. |
| Write | A woman walks through heavy rain while holding a transparent umbrella above her head. | Clearly describes the action and relationship between the woman, umbrella, and rain. |
| Instead of | character, sofa, book | Lists the character and objects without explaining how they interact. |
| Write | The character sits on the sofa while holding an open book in both hands. | Clearly describes the character's position, action, and interaction with the objects. |
Relationships often provide more useful information than simply adding more keywords.
Use Exact Counts When They Matter
You can request specific quantities.
Examples:
One character stands in the center of the image.
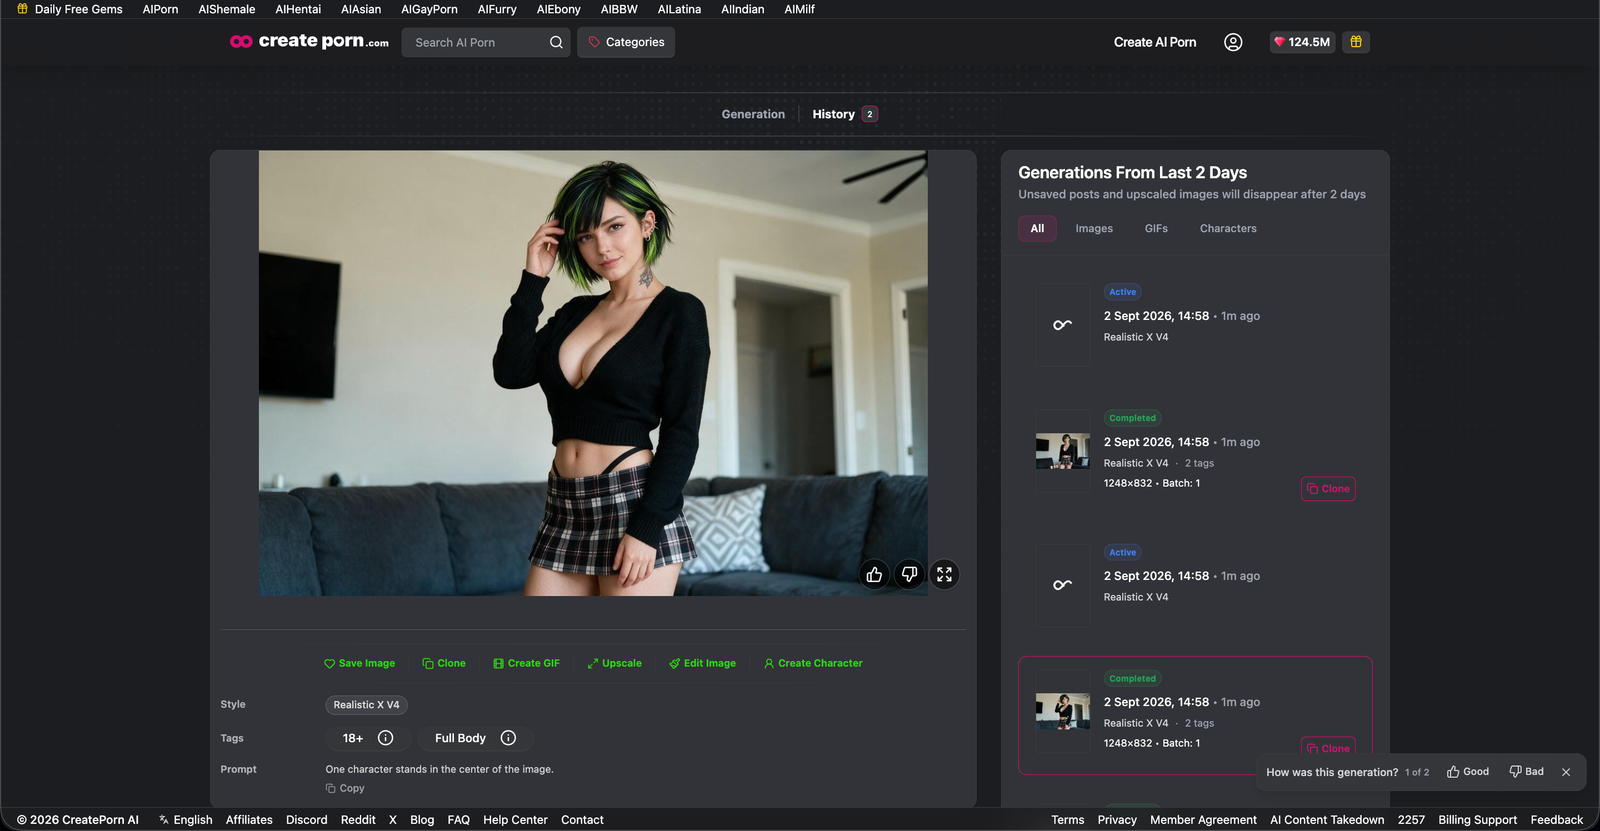
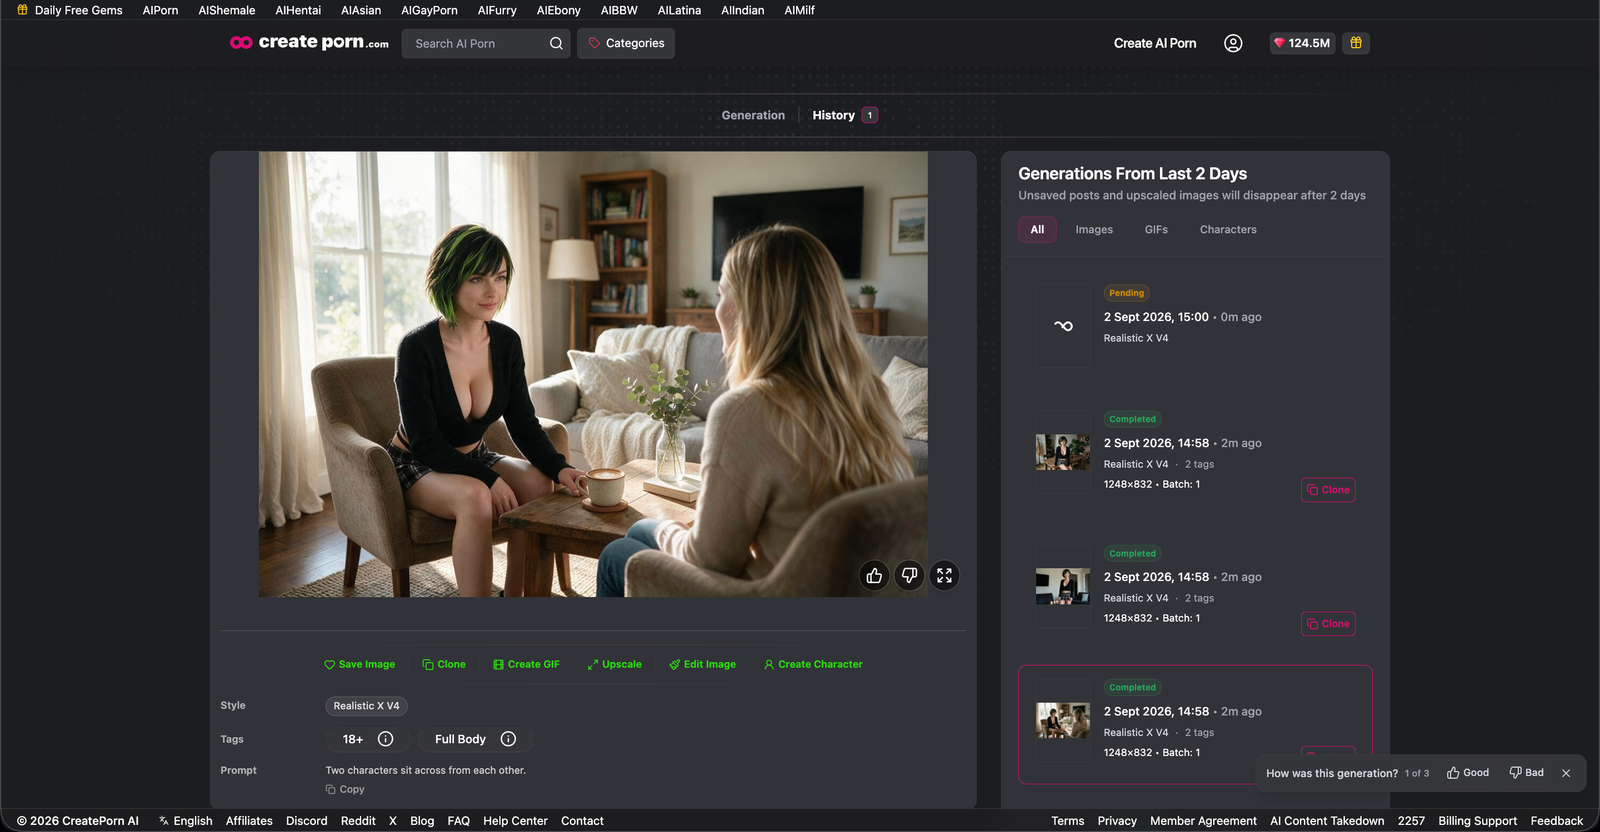
Two characters sit across from each other.
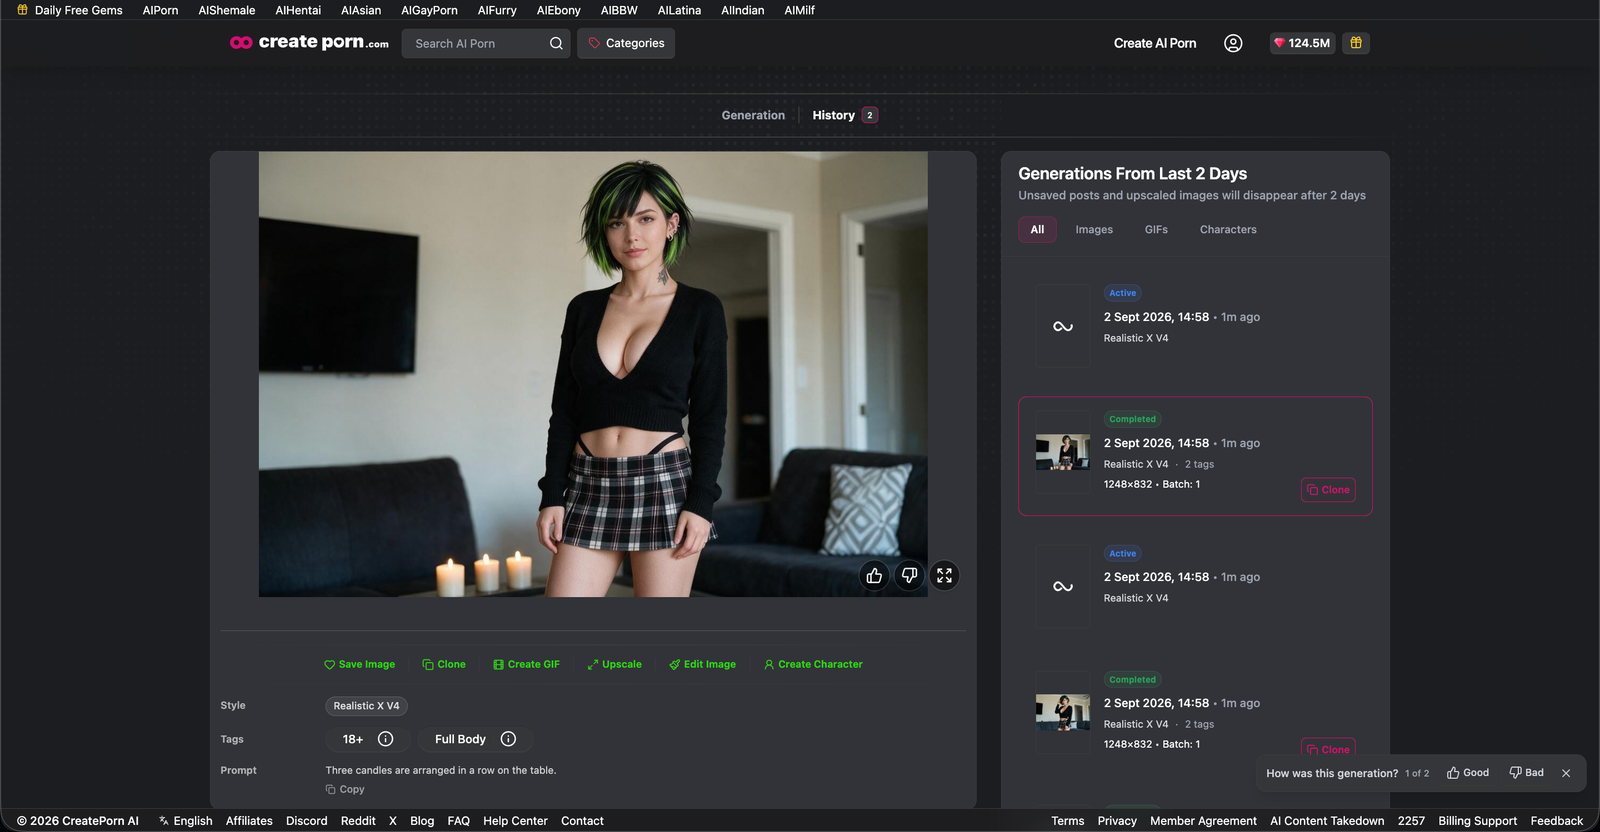
Three candles are arranged in a row on the table.
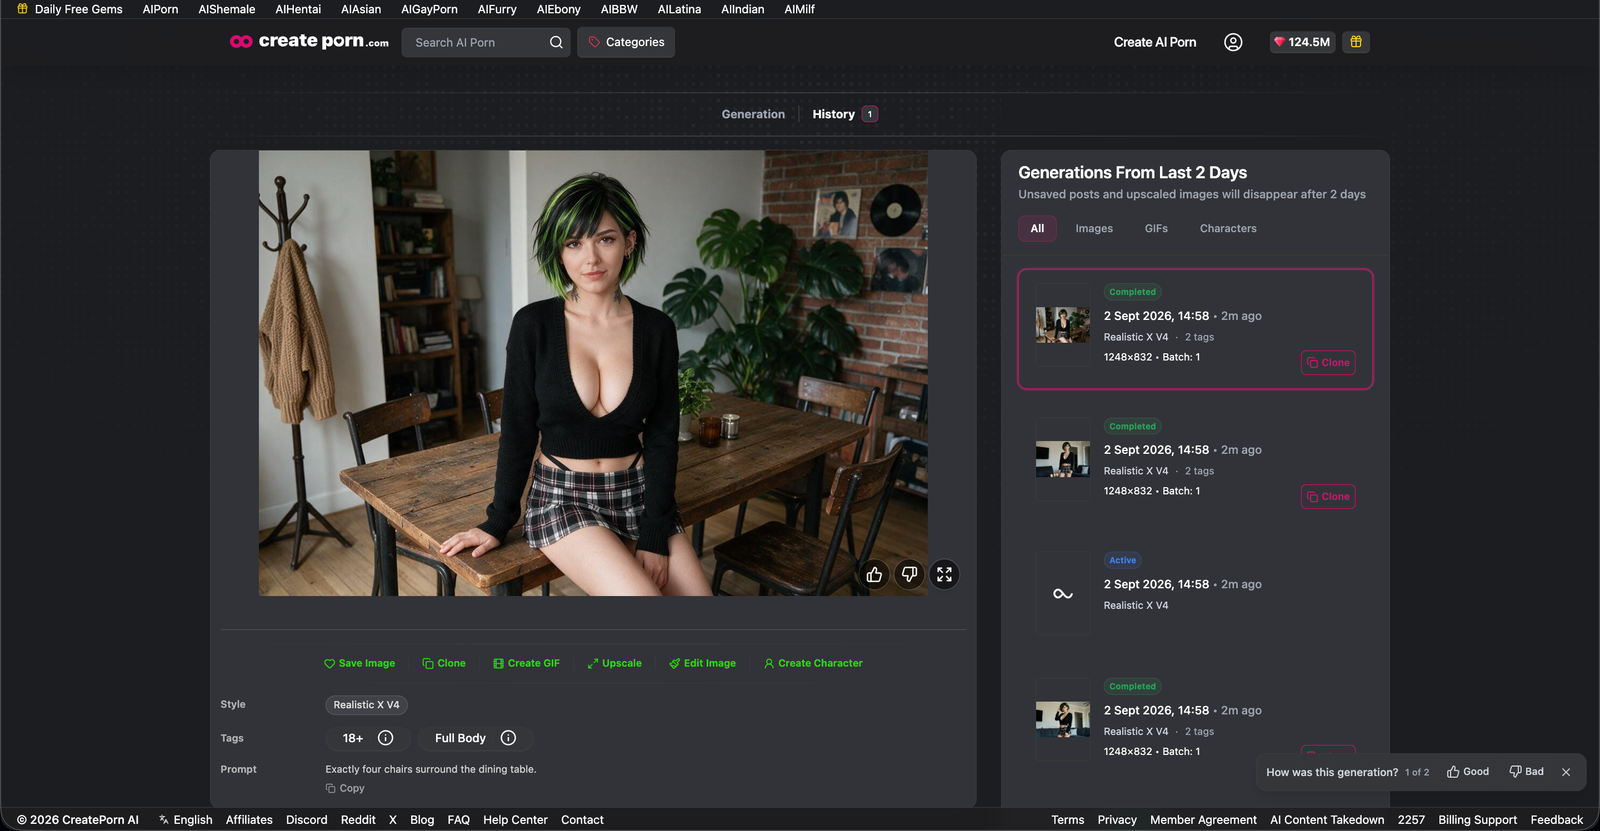
Exactly four chairs surround the dining table.
AI image models may still occasionally produce the wrong count, especially when scenes become complicated. If this happens, simplify the scene or regenerate.
Using Multiple Characters in Natural Language Prompts
When generating with multiple selected characters, clearly tell Lucid or Studio which selected character should appear where and what each character should do.
Select Multiple Characters
Choose the characters you want to include in the generation.
The order in which you select them matters because you can refer to them in the prompt as:
- Image 1
- Image 2
- Image 3
- ...and so on.
Assign Each Character Clearly
Describe each character in the same order they were selected.
A useful structure is:
Place the character in Image 1 [position/action]. Place the character in Image 2 [position/action]. [Describe how they interact and the environment.]
Example:
Two characters sit across from each other. Place the woman in Image 1 on the left and the woman in Image 2 on the right. They are laughing happily together in a cafe.
Be Specific About Position and Action
When using multiple characters, avoid vague instructions such as:
Make them sit together.
Instead, clearly identify:
- Which character is which
- Where each character should appear
- What each character should be doing
- How they should interact
For the following examples, we'll be pulling from our library of consistent character references.
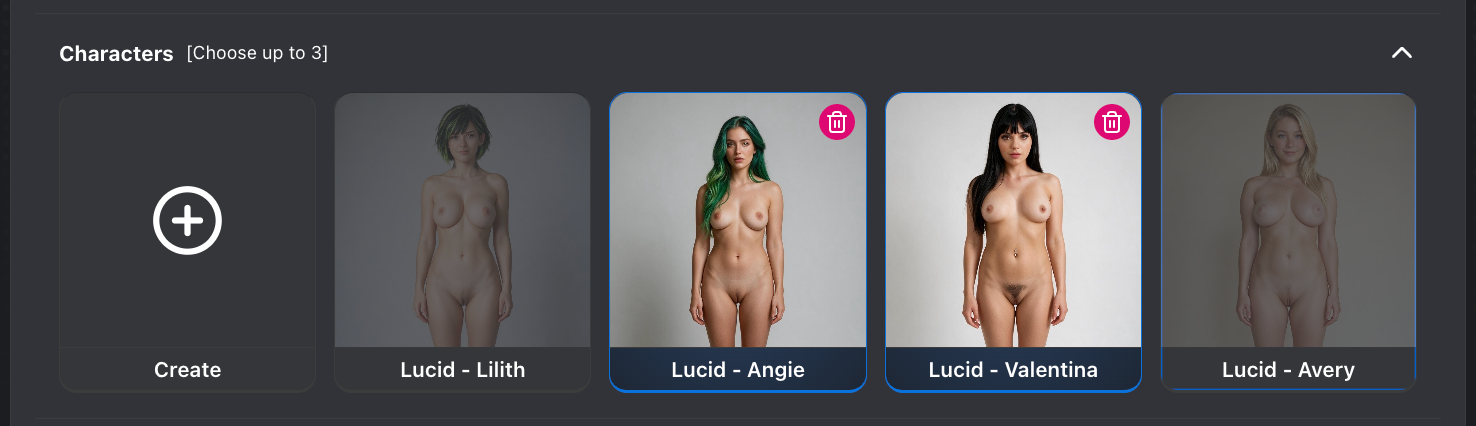
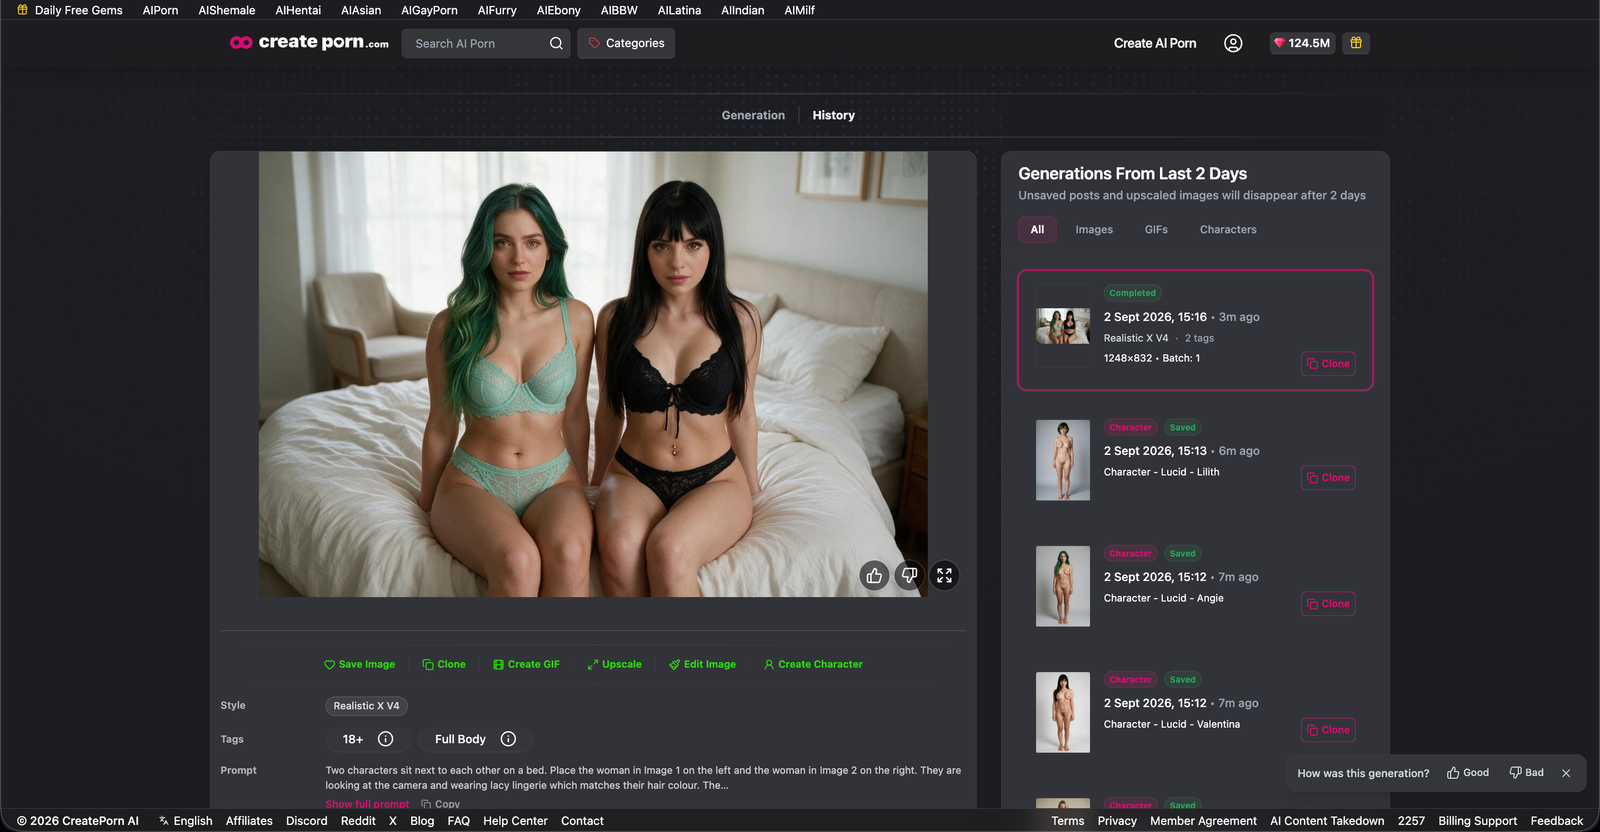
Example:
Two characters sit next to each other on a bed. Place the woman in Image 1 on the left and the woman in Image 2 on the right. They are looking at the camera and wearing lacy lingerie which matches their hair colour. The characters exude an alluring, seductive vibe. They are looking at the viewer with doe eyed stares.
Use Image Order Consistently
If you refer to a selected character as Image 1, keep using Image 1 for that same character throughout the prompt.
Avoid switching between vague terms such as:
the first woman
the other woman
her
she
when the scene is complex.
For clearer prompts, use:
The woman in Image 1...
The woman in Image 2...
Multiple Character Prompt Formula
[Number of Characters] + [Image 1 Position and Action] + [Image 2 Position and Action] + [Interaction] + [Environment] + [Camera / Lighting / Style]
For the following examples, we'll be pulling from our library of consistent character references.
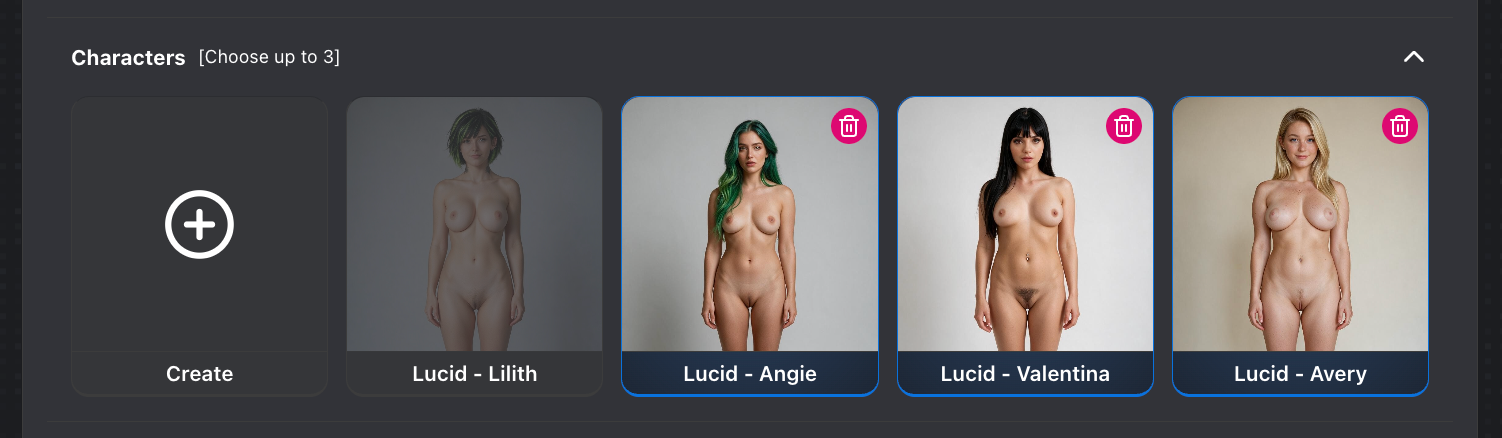
Example:
Three characters sit together on a bed. Place the woman in Image 1 on the left, the woman in Image 2 in the center, and the woman in Image 3 on the right. They are looking at the camera and wearing lacy lingerie that matches their hair color. The characters exude an alluring, seductive vibe and gaze at the viewer with doe-eyed expressions.
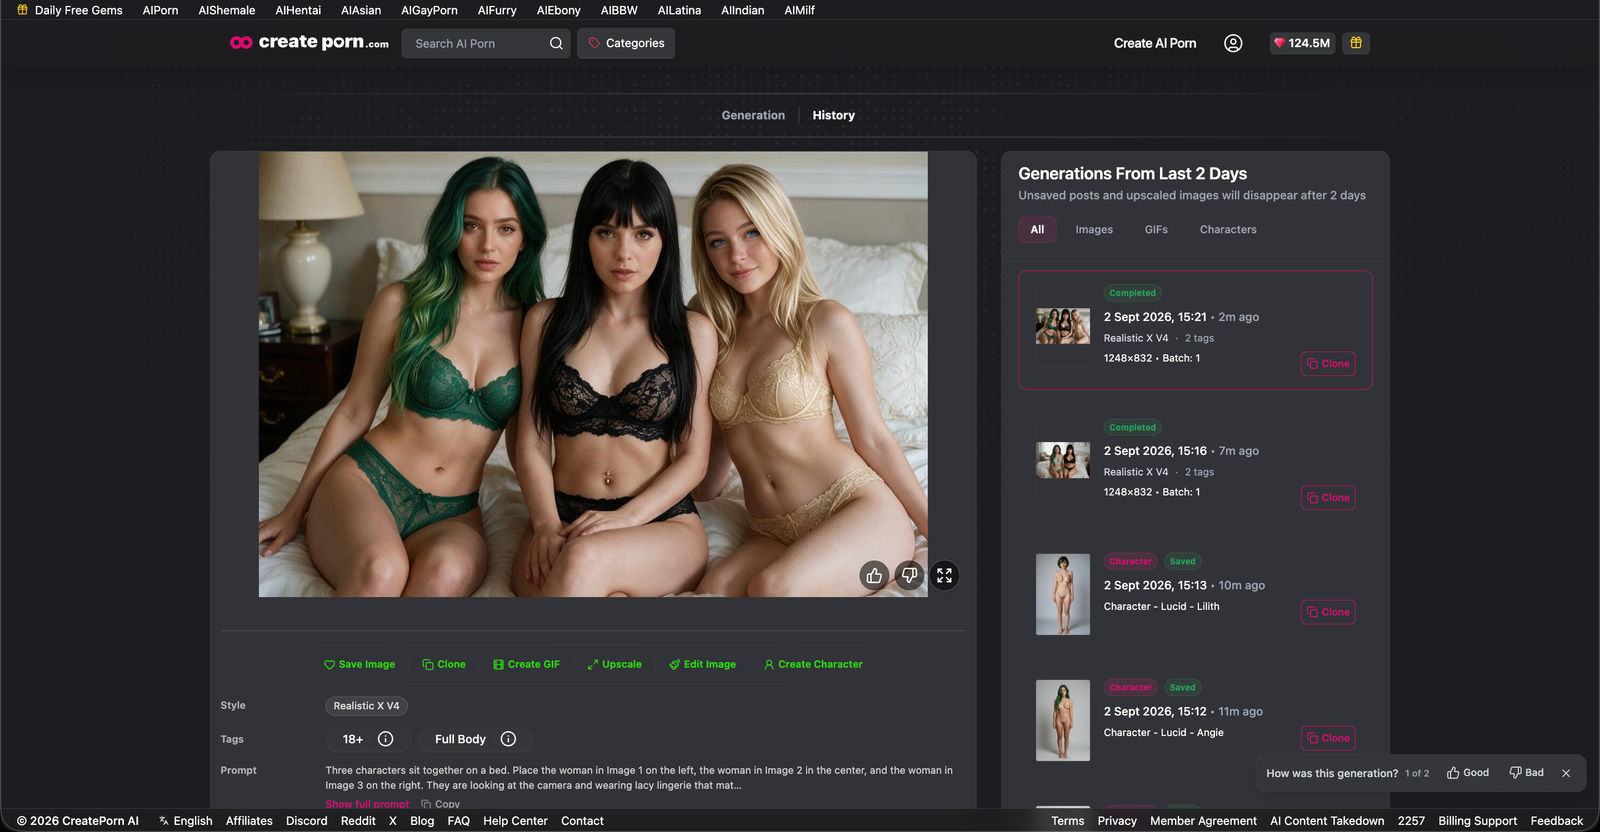
Tip: The more characters you include, the more important it becomes to clearly assign each character's position, action, and role in the scene.
Avoid Conflicting Instructions
Natural Language models consider the prompt as a whole.
If different parts of the prompt contradict each other, the Engine may struggle to determine which instruction should take priority.
Avoid prompts such as:
Bright midday sunlight in the middle of the night.
The character faces completely away from the camera while looking directly into the camera.
Also be careful when combining several unrelated styles.
Instead of:
photorealistic anime watercolor 3D pencil drawing cinematic photograph
choose the visual direction that matters most.
Avoid Overly Complex Prompts
More detail does not automatically produce a better image.
If your prompt contains too many competing instructions, the model may ignore some elements or combine them unpredictably. This is also one of the common causes of prompts not being followed in existing generation troubleshooting guidance.
Start with the important details and add more only when necessary.
| Step | Instruction | Purpose |
|---|---|---|
| Start Simple | A woman wearing medieval armor stands inside a castle. | Establishes the core subject and setting before adding extra detail. |
| Add Important Detail | A woman wearing dark steel medieval armor with gold detailing stands inside a stone castle. | Adds more specific visual details about the armor and environment. |
| Add Camera | Show her in a low-angle full-body shot. | Defines how the subject should be framed and viewed. |
| Add Lighting | Warm torchlight illuminates her from the right side. | Adds mood and explains how the scene should be lit. |
This makes it easier to identify which instruction changes the result.
Avoid "Quality Word" Overload
Adding large numbers of generic quality terms usually provides less control than adding meaningful visual information.
| Version | Prompt | Why It Works |
|---|---|---|
| Avoid Relying On | masterpiece, best quality, amazing, beautiful, incredible, ultra detailed, 8K | These generic quality terms do not clearly explain what visual result you want. |
| Instead of | amazing cinematic lighting | The instruction is subjective and does not describe how the scene should actually be lit. |
| Write | Warm sunset light comes from behind the character, creating long shadows and a thin rim light around her hair. | Clearly defines the light source, direction, shadow behavior, and visual effect. |
| Instead of | amazing detailed background | The instruction does not explain what should appear in the background. |
| Write | The background contains a narrow city street lined with neon storefronts and rain-covered pavement. | Describes the specific environment and visible details the model should generate. |
Describe why the image should look good instead of repeatedly telling the Engine that it should look good.
Focus Each Instruction on One Clear Idea
If a generation is struggling, simplify the instructions.
For example, instead of trying to change:
- Hairstyle
- Clothing
- Pose
- Background
- Lighting
- Camera
- Art style
all at once, change the most important element first.
Once that works, continue refining the result.
This is particularly useful for reference-image editing because large numbers of simultaneous changes can make preservation more difficult.
Iterate on Your Prompt
You do not need to create the perfect prompt on your first attempt.
A useful workflow is:
- Generate the basic idea.
- Review what worked and what did not.
- Identify one or two specific problems.
- Rewrite those instructions more clearly.
- Generate again.
- Continue refining until the result matches your goal.
For example:
| Step | Instruction | Purpose |
|---|---|---|
| First Prompt | A woman wearing medieval armor stands inside a castle. | Establishes the core subject and setting. |
| Second Prompt | Make the armor dark steel with gold detailing. | Refines the character's clothing without changing the rest of the scene. |
| Third Prompt | Show her in a low-angle full-body shot. | Adjusts the camera angle and framing. |
| Fourth Prompt | Add warm torchlight coming from the right side of the scene. | Refines the lighting and overall mood. |
Changing one thing at a time makes it easier to understand how Lucid interprets your instructions.
Converting a Lab Prompt to Natural Language
If you already have a prompt that works in a Lab Engine, you can rewrite it for Lucid or Studio.
| Prompt Type | Prompt | What It Shows |
|---|---|---|
| Lab Prompt | woman, black hair, ponytail, green eyes, red dress, standing, city street, night, rain, neon lights | Uses separate tags to describe the subject, appearance, clothing, action, environment, and lighting. |
| Natural Language Version | A woman with green eyes and black hair tied into a ponytail stands on a rainy city street at night wearing a red dress. Bright neon storefront lights reflect across the wet pavement. | Explains how the individual details relate to each other and adds clearer scene context. |
| More Complex Lab Prompt | woman, knight, red hair, silver armor, sword, forest, fog, full body, low angle, cinematic lighting | Uses tags to describe a more detailed character, environment, composition, and lighting setup. |
| Natural Language Version | A red-haired female knight wearing weathered silver armor stands in a foggy forest while holding a longsword. Show her in a full-body shot from a slightly low angle. Soft cinematic light filters through the trees behind her. | Converts the same concepts into connected instructions covering appearance, action, camera angle, and lighting. |
You do not need to convert every individual tag word-for-word. Rewrite the prompt as a coherent description of the finished image.
Natural Language Prompt Templates
These templates can help you get started.
| Prompt Type | Template | Example |
|---|---|---|
| Lucid or Studio Text-to-Image | Create a [STYLE] image of [SUBJECT] with [APPEARANCE], wearing [COSTUME]. [ACTION]. The scene takes place in [ENVIRONMENT]. Frame the image using [CAMERA / COMPOSITION]. Use [LIGHTING] with [COLOR / MOOD]. | Create a cinematic image of a woman with long silver hair wearing black fantasy armor. She stands beside a white horse in a snowy forest. Frame her in a full-body three-quarter view from slightly below eye level. Use soft blue morning light with a cold, atmospheric mood. |
| Lucid Reference Image | Use the reference image as [PURPOSE]. Change [TARGET] to [NEW RESULT]. Keep [PRESERVED ELEMENTS] unchanged. Match the new element to the existing [LIGHTING / PERSPECTIVE / STYLE]. | Use the reference image as the base image. Replace the character's blue jacket with a fitted red leather jacket. Keep her face, hairstyle, pose, camera framing, and background unchanged. Match the new jacket to the existing lighting, shadows, and perspective. |
| Lab Engine | [subject], [appearance], [costume], [action], [environment], [camera], [lighting], [style] | woman, long black hair, green eyes, red leather jacket, standing, motorcycle, city street, rain, night, full body, cinematic lighting |
woman, long black hair, green eyes, red leather jacket, standing, motorcycle, city street, rain, night, full body, cinematic lighting
Quick Reference: Lucid, Studio, and Lab Engines
| Feature | Lucid | Studio | Lab Engines |
|---|---|---|---|
| Natural Language | Recommended | Recommended | Not the primary method |
| Complete sentences | Recommended | Recommended | Usually unnecessary |
| Comma-separated tags | Not recommended as the main format | Not recommended as the main format | Recommended |
| Commands such as Add, Remove, Keep, Replace | Recommended | Recommended where applicable | Limited/Engine-dependent |
| Spatial relationships | Recommended | Recommended | More dependent on tags/model behavior |
| Reference instructions | Major use case | Workflow-dependent | Engine-dependent |
| (tag:1.2) weighting | Do not rely on it | Do not rely on it | Supported by applicable Engines |
| Best approach | Describe the intended result | Describe the intended result | Describe concepts using tags |
Tips
Write Like You Are Giving Instructions to an Artist
- Explain the scene clearly instead of trying to find special trigger words.
Put the Most Important Information First
- Start with the main character, action, or scene before adding secondary details.
Be Specific About Relationships
- Explain who is holding an object, where characters are standing, and how different parts of the image interact.
Use Clear Names Instead of Pronouns
- "Change the woman's jacket" is clearer than "change it."
Describe What Should Stay the Same
- When using a reference image, preservation instructions can reduce unwanted changes.
Use Concrete Visual Descriptions
- "Warm backlighting from the sunset" is more useful than "beautiful lighting."
Avoid Conflicting Instructions
- Make sure different parts of your prompt describe a compatible result.
Do Not Add Detail Just to Make the Prompt Longer
- Only include information that meaningfully changes the image.
Change One or Two Things at a Time When Troubleshooting
- Smaller adjustments make it easier to understand what the Engine is responding to.
Expect Some Variation
- AI-generated images are not guaranteed to reproduce every requested detail exactly. Results can vary depending on the Engine, Style, settings, prompt complexity, and current model capabilities.
Need Help?
If Lucid or Studio is repeatedly ignoring part of your prompt:
- Check for conflicting instructions.
- Simplify the prompt and remove unnecessary details.
- Clearly identify the character or object you want to change.
- Describe the desired final result rather than using vague instructions.
- For reference images, specify both what should change and what should remain unchanged.
- Try making one major change at a time.
- Generate again and compare the result.
If the same important instruction continues to be ignored after simplifying and testing the prompt, keep the complete prompt and affected generation available when contacting Support. Existing troubleshooting guidance recommends providing the prompt, affected creation, expected result, and what was generated instead so the issue can be reviewed properly.